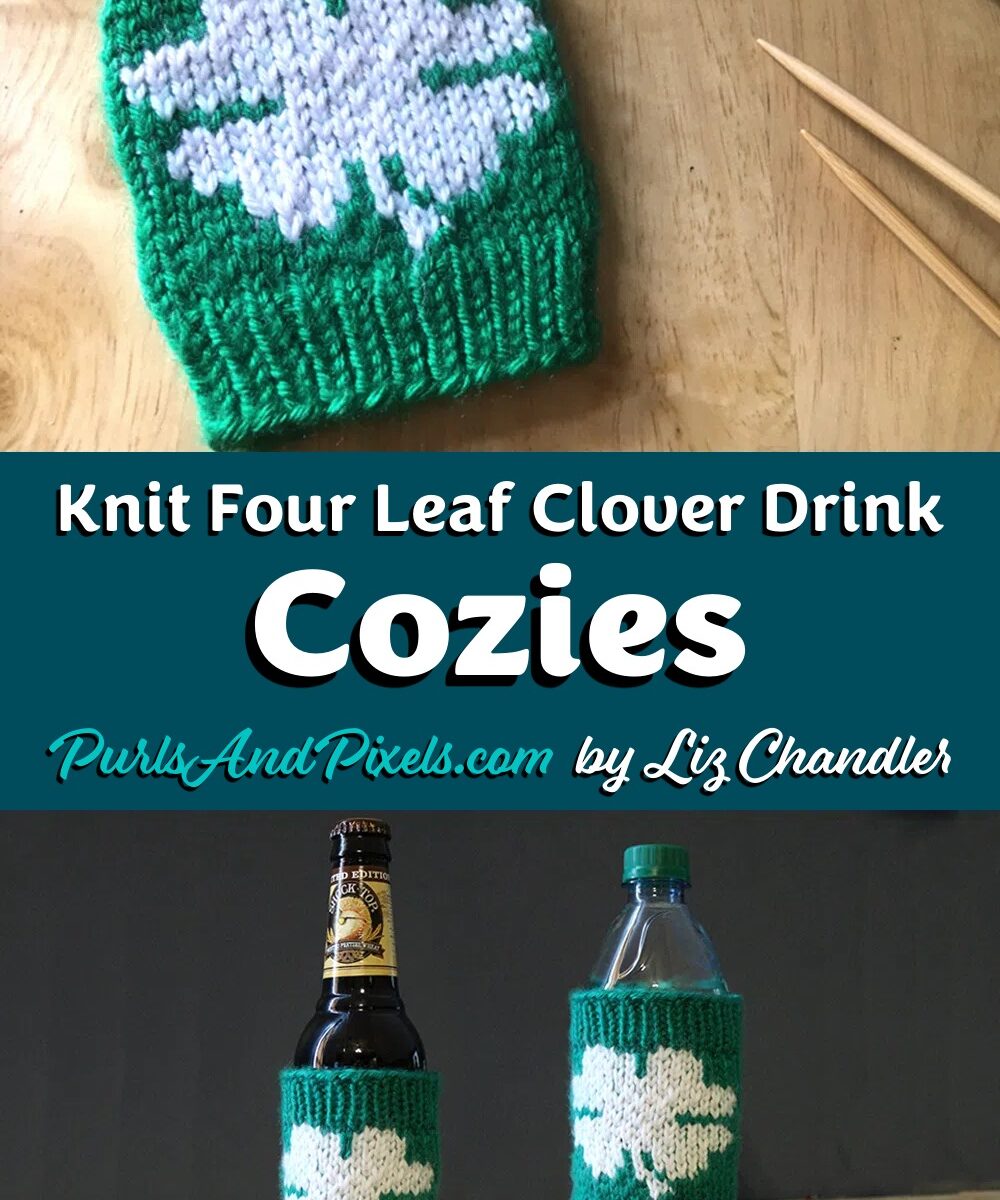
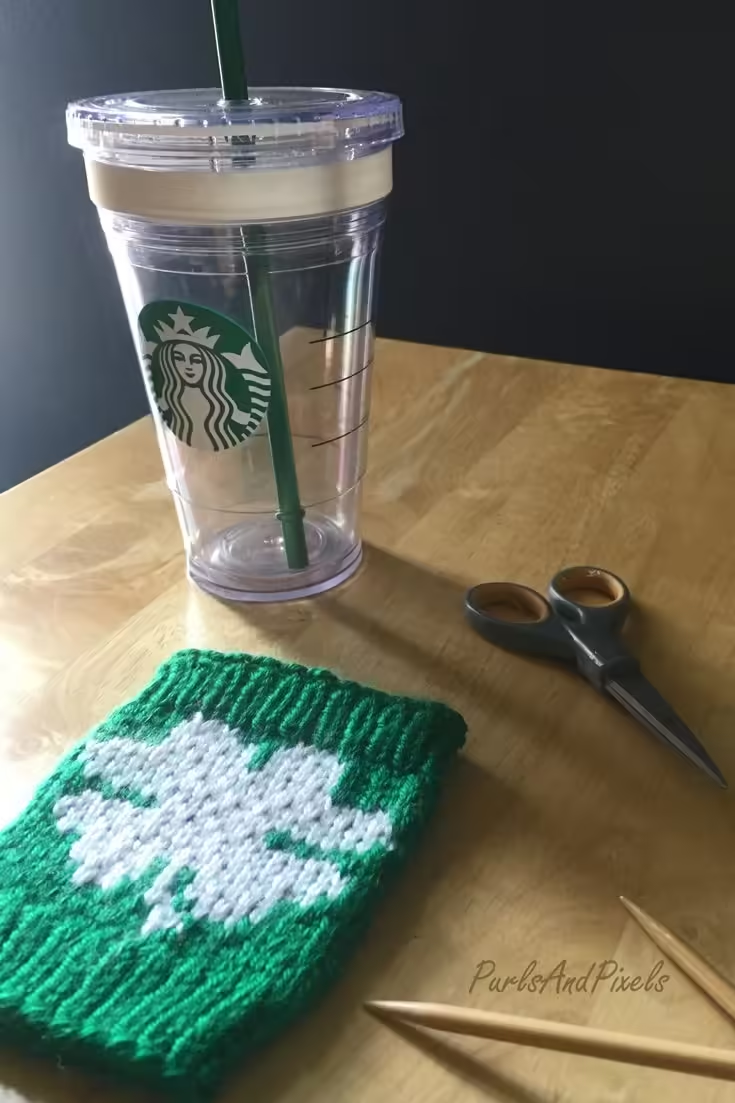
Knit an adorable sweater for your favorite bottle or coffee cup. This little green knit coffee cozy has a big white shamrock on each side. Knit your own bottle cozy or coffee cozy from my free patterns and charts here.
How this Knit Cozy is Made
Here you will find two separate, but similar knitting patterns. One pattern is for a lucky clover beer and bottle cozy. The other knitting pattern shows you how to make a lucky clover coffee cozy. The coffee cozy is four rows wider, so it should fit most tall, handle-less coffee cups. The bottle cozy will fit most 16-20 ounce bottles of beer, water, soda, or even baby bottles.
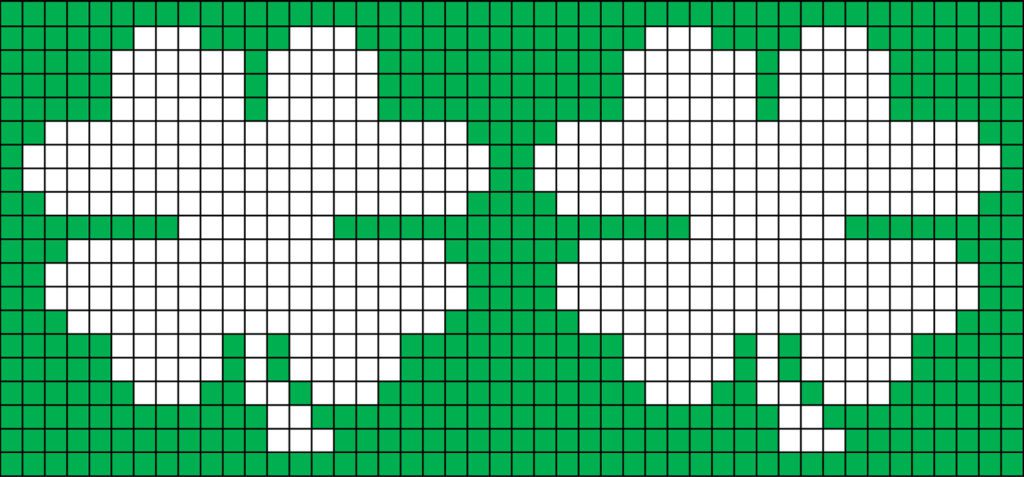
These adorable cozies are made with two basic stitch patterns, that are knit in the round: the knit, purl rib, and the stockinette stitch. The four leaf clover pattern is knit into the cozy using a fair isle technique and carrying the two colors along together as you work.
This cozy is a quick project that is perfect for scrap yarn that has been left over from another project. You only need between .6 and .8 ounces or 19 -21 yards of yarn to make this minimalist coffee cozy. If you need help figuring out how much scrap yarn you have left, my post on yarn math might be useful.
I used Caron Simply Soft yarn to design the pattern, which is a basic, acrylic, worsted-weight yarn. Try any solid color you like, or mix it up with a variegated or patterned yarn. You can substitute almost any worsted weight yarn in almost any material, like sheep’s wool, alpaca, cotton or even a silk-blend for this project.
Materials
- One 315-Yard Skein of Caron Simply Soft worsted weight yarn in Green and One Skein of Caron Simply Soft worsted weight yarn in White
- Each cozy uses about 21 yards of (.8 oz.) total (You will need about .4 oz of white and .4 oz of green)
- No. 3/3.125 MM double point needles (DPNs) (or two sizes smaller than needles used to obtain gauge)
- No. 5/3.75 MM double point needles (DPNs) (or size needed to obtain gauge)
- One stitch marker
- Measuring tape
- Tapestry needle
Abbreviations
k = Knit.
p = Purl.
** = Repeat the pattern between the asterisks.
Gauge
20 stitches and 28 rows in stockinette = 4 inches on No. 5/3.75 MM needles
Instructions: Lucky Coffee Cozy
(4.5 inches tall and fits cups 9-11 around)
Knit in the round. Use stitch marker to keep track of the beginning/ends of your rows by placing it in the first stitch of each row/round.
[Using no. 3 DPNs] In Green, Row 1: Cast on 50 stitches. Divide onto 3 DPNs. Join, taking care not to twist stitches. *k 1, p 1* x 25 (50 stitches).
Rows 2 thru 7: *k 1, p 1* x 25 (50 stitches).
[Switch to no. 5 DPNs] Start applying the knitting chart, switching between green and white yarn. Begin at the bottom right corner and work to the left, while knitting in this pattern: Rows 8 thru 28: k 50 (50 stitches).

[Switch to no. 3 DPNs] Rows 29 thru 35: *k 1, p 1* x 25 (50 stitches).
[Switch to no. 5 DPNs] Row 36: Bind off.
Weave in ends. Block if desired.

Printable lucky clover coffee cozy knitting pattern and chart PDF by Liz @PurlsAndPixels
Instructions: Lucky Bottle Cozy
(4.5 inches tall and fits bottles 7-8 inches around)
Knit in the round. Use stitch marker to keep track of the beginning/ends of your rows by placing it in the first stitch of each row/round.
[Using no. 3 DPNs] In Green, Row 1: Cast on 50 stitches. Divide onto 3 DPNs. Join, taking care not to twist stitches. k 1, p 1 x 23 (46 stitches).
Rows 2 thru 7: k 1, p 1 x 23 (46 stitches).
[Switch to no. 5 DPNs] Start applying the knitting chart, switching between green and white yarn. Begin at the bottom right corner and work to the left, while knitting in this pattern: Rows 8 thru 28: k 46 (46 stitches).
[Switch to no. 3 DPNs] Rows 29 thru 35: *k 1, p 1* x 23 (46 stitches).
[Switch to no. 5 DPNs] Row 36: Bind off.
Weave in ends. Block if desired.
Printable lucky clover bottle cozy knitting pattern and chart PDF by Liz @PurlsAndPixels
Size Notes
These are one-size-fits-most patterns.
The coffee cozy should fit most hot and hold coffee cups that don’t have handles. The bottle cozy should fit most 16 to 20 ounce bottles.
Care
Hand-wash cold separately and lay-flat to dry.
©2017, Liz Chandler of PurlsAndPixels.
This pattern is for personal use, gifting, and charitable donation of completed items. You may also sell handmade items created using this pattern. Do not copy this pattern and distribute it. If you’d like to share the pattern, refer your friends to my website, purlsandpixels.com so they may obtain a copy.
If you find any errors or have any questions, email purlsandpixels@gmail.com and I will do my best to help.
I’d love to see your finished work! Tag your photos with @PurlsAndPixels on Twitter or Instagram.
More Knitting Patterns You’ll Love
Don’t Miss a Stitch 💌
Love cozy knitting projects? Follow along on YouTube, Pinterest, and Instagram,
or join the newsletter for more free patterns and gentle knitting tips.


 Instructions