Let’s talk about the ultimate homesteading accessory. Nope, it’s not a chicken coop or a shiny new canner (although those are fabulous). It’s a pair of knitting needles! Yes, knitting is the unsung hero of homestead hobbies, and if you’re not already in on this cozy little secret, it’s time to grab some yarn and get started.
Why Knitting and Homesteading Go Hand-in-Hand
Picture this: a crackling fire, a cup of tea in your favorite mug, and you sitting in your comfiest chair knitting a cozy scarf while the bread rises in the oven. Can you feel the warmth and satisfaction already? Knitting fits seamlessly into the homesteading lifestyle because it’s about creating something with your own two hands—just like gardening, baking, or DIY projects.
Plus, knitted items are practical. Socks, sweaters, hats—they’re not just cozy; they’re necessities when you’re braving frosty mornings to feed the chickens or chop wood.
The Patterns You Need Right Now
If you’re ready to dive in, I’ve got you covered with beginner-friendly knitting patterns that are as practical as they are pretty. Start with my Easy Peasy Washcloth Pattern, perfect for scrubbing those farmhouse sinks, or try the Warm and Toasty Hat Pattern, which will keep you snug through snowy winters. And for the advanced knitters out there, my Rustic Rice Stitch Blanket Pattern is a must for curling up on the couch after a long day.
You can find these free patterns and more in my Knitting Patterns Page (go ahead, click—I promise it’s worth it).
Knitting isn’t just about the finished product; it’s about the process. It’s a slow, meditative craft that pairs perfectly with the pace of homesteading life. Need a moment to unwind after wrangling the goats? Pick up your needles. Want to make something special for a loved one? Knit them a hat.
Knitting also has a way of bringing people together. Host a knitting circle in your cozy kitchen, or teach your kids to make their own winter hats. You’ll be passing on a skill that’s equal parts practical and heartwarming.
More Cozy Homestead Inspiration
If you love the idea of adding some rustic charm to your home, be sure to check out my Homesteading Lifestyle Articles for tips on everything from gardening to DIY home décor. Whether you’re a full-fledged homesteader or just dabbling, you’ll find plenty of inspiration to make your home a cozy haven.
Let’s Get Knitting!
So, what are you waiting for? Dust off those needles, grab a skein of yarn, and let’s create something beautiful. Don’t forget to explore my knitting patterns and homesteading articles. I’ve got everything you need to turn your dreams of cozy, handmade living into a reality.
If you’re in the mood to add some cozy, handmade touches to your living space, these knitting patterns make for quick knitting projects. These easy and free craft ideas from Liz Chandler at PurlsAndPixels.com are perfect for a relaxing weekend. Each project is quick, simple, and brings warmth and charm to your home decor. Let’s get started!
5 Easy Home Decor Knitting Projects
1. Basic Pillow Cover
Add instant coziness to your couch or bed with this simple pillow cover pattern. It’s beginner-friendly and customizable to match any color scheme.
Knit up a luxurious washcloth that’s both practical and stylish. This quick knitting project is a quick way to bring texture and a handmade vibe to your bathroom or kitchen.
Get festive and functional with this colorful pot holder. It’s a practical addition to your kitchen and doubles as cheerful knitted home decor during the holidays.
This heart-shaped face scrubby is a quick knit that adds a personal, charming touch to your skincare routine. It’s also an excellent way to use up leftover yarn.
With these quick and easy projects, your weekend will be full of creativity and cozy vibes. Knitting home decor is both a fun hobby and adds that unique touch to your home. Which project will you try first? Let me know in the comments! Happy knitting!
Need supplies for your quick knitting project?
Find the yarn and knitting needles you will need for all of these projects on my Amazon Influencer Affiliate Collection page.
Cozy, Crafty & Homestead-Ready Gifts to Make Them Smile 🎁
‘Tis the season to get cozy, knit some magic, and make your homesteading friends squeal with joy. If you’re on the hunt for the perfect gift that says, “I care about you and your crafty, self-sufficient lifestyle,” you’ve landed in the right place. Let’s dive into these warm and rustic gift ideas in my holiday gift guide.
Learn to Knit Gift Set
Who do you know that would love knitting, but just hasn’t had the chance to learn? Think of that person’s favorite colors, then get ready to make them a custom, DIY gift set. Gather yarn, knitting needles, and a cute tote or box. Toss in a card with a link to my online knitting guide. Or upgrade your kit by including a copy of Liz Chandler’s Knitting Guide. This knitting book will teach them everything they need to know and include oodles of classic patterns they’ll never want to stop knitting. I’ve put together a list of suggested materials on my Learn to Knit Gift Set page; read it here.
Cozy Home Decor
A thoughtful gift can feel just like a warm hug, bringing comfort and coziness to their home. Think about soft, fluffy throw blankets for curling up on the couch, gentle lighting like a pretty lamp or string lights to create a calming glow, or something special to help them enjoy their favorite warm drink; maybe a cute mug, a coffee sampler, or a new tea kettle. These little touches can add warmth and make their space feel even more inviting. Browse my list of extra-cozy home goods on Amazon to find the perfect gift.
Homestead Helper
Got a friend who dreams of raising chickens and growing all their own veggies? Help them create the homestead of their dreams with some practical goodies: a really nice drill, a sturdy toolbox, or some cool gardening gloves. Or help them automate their lifestyle with chicken coop doors that open on their own or machines that feed the animals. Find my holiday gift guide of homesteading goodies on Amazon.
DIY Craft Kits
Sure, you could buy them a candle or a bar of soap—but why not give them a whole kit so they can make their own? A candle-making kit, soap-making set, or cheese-making supplies will keep them busy and their home smelling like a rustic dream. (Bonus: You might even get some homemade goodies as a thank-you!) Browse some unique DIY Craft Kits on Amazon.
So, there you have it: a holiday gift guide that’s as cozy as a hand-knitted blanket and as fun as a night around the bonfire. Go forth, spread some holiday cheer, and don’t forget to snag a little something for yourself (you’ve earned it!).
Happy Holidays!
Looking for more inspiration? Make something festive:
These soft, gooey cinnamon rolls have a delicious twist: a sweet maple cream filling and a simple maple glaze that bring out the cozy flavors of real maple syrup. Perfect for making with kids or sharing with the family!
You will start this project by making a fluffy bread base. Mix together flour, yeast, sugar, milk, melted butter, and an egg.
Knead Dough
Turn the cinnamon roll dough mixture out onto a smooth surface. I used a cutting board, but a smooth and clean countertop works just as well.
With clean hands, knead the dough until it is fully combined and smooth.
Cover Dough and Let it Rise
Place the dough back in the mixing bowl. Cover with clear plastic wrap. Let the cinnamon roll dough rise for about 30 minutes, or until it has doubled in size.
Make the Maple Cinnamon Roll Filling
While the dough rises, you can make the maple cinnamon filling. Combine room-temperature butter with brown sugar, cinnamon, and maple syrup. Then gently blend together until the mixture is smooth.
Roll out the Dough And Spread the Filling
Using a rolling pen, flatten the dough into a large, 12-inch by 19-inch rectangle.
Spread the filling onto the rectangle of dough.
Roll and Slice Your Maple Cream Cinnamon Rolls
Next comes the tricky part; turn the dough into swirled log by rolling the long edge of the dough up and into itself. Imagine you are rolling up an area rug that is going into storage.
Slice and Bake
Slice into 12 even rolls and place them in a 9-inch by 13-inch baking dish. Then, if any leftover filling has squeezed out onto the cutting board, spread it across the top of the rolls. Cover the cinnamon rolls with plastic wrap and allow to rise for another 30 minutes or until they’ve doubled in size.
Drizzle With Heavy Whipping Cream
Warm heavy whipping cream for 15 seconds in the microwave. It may bubble over, so use a coffee cup or larger measuring cup to warm the cream. Then drizzle it over the cinnamon rolls just before baking.
Bake Until Golden and Bubbly
Bake in a preheated 350 degree oven until the cinnamon rolls are golden brown and the gooey filling is hot and bubbling.
Let Cool while Making the Maple Cream Cheese Frosting
The Maple Cream Cinnamon Rolls will need to cool for about 10 minutes before you can frost them, so right after they come out of the oven is a great time to mix up your frosting. Combine powdered sugar, maple syrup, melted cream cheese, milk and just a pinch of course kosher or sea salt to cut the sweetness.
Mix the frosting together then, (if it has been 10 minutes) drizzle it over the cinnamon rolls.
Serve and Enjoy
When your Chicken and Rice Soup recipe has finished cooking, you are ready to eat! Let it cool a little, then serve cozy meals to your whole family. Or, save the batch in individual soup containers and freeze for later.
Maple Cream Cinnamon Roll Recipe
Serving Size:
Makes 12 Rolls
Time:
45 Minutes
Difficulty:
Intermediate
Oven Temperature 350°F (175°C)
Ingredients For the Dough:
3 ½ cups all-purpose flour
1 packet (2 ¼ tsp) instant yeast
¼ cup granulated sugar
½ tsp salt
¾ cup warm milk (110°F)
¼ cup butter, melted
1 egg For the Filling:
½ cup butter, softened
¾ cup brown sugar
2 tbsp ground cinnamon
¼ cup real maple syrup
¼ cup heavy whipping cream (for extra gooeyness) For the Maple Glaze:
1 cup powdered sugar
2 tbsp real maple syrup
2 tbsp melted cream cheese
2 tbsp milk
Pinch of coarse Kosher or Sea Salt (to balance the sweetness)
Directions
Make the Dough: In a large bowl, combine flour, sugar, salt, and yeast. In a separate bowl, whisk together warm milk, melted butter, and egg. Add the wet ingredients to the dry ingredients, mixing until a soft dough forms. Knead the dough on a floured surface for about 5 minutes until smooth and elastic. Place the dough in a greased bowl, cover with a clean towel, and let it rise in a warm place for 1 hour, or until doubled in size.
Prepare the Filling: In a small bowl, mix the softened butter, brown sugar, cinnamon, and maple syrup until well combined.
Roll and Fill the Dough: Roll out the dough into a large rectangle (about 12×18 inches). Spread the filling evenly over the dough, leaving a small border around the edges. Starting from the long side, roll the dough tightly into a log and cut into 12 even rolls.
The Extra Gooey Secret: Place the rolls in a greased 9×13-inch baking dish. Spread any excess filling onto the top of the cinnamon rolls. Warm the heavy cream slightly and pour it evenly over the rolls before baking.
Bake: Preheat your oven to 350°F (175°C). Cover the rolls with a towel and let them rise for another 20-30 minutes. Warm the heavy cream slightly and pour it evenly over the rolls before baking. Bake for 35 – 40 minutes, until golden brown and bubbling at the edges.
Make the Maple Glaze: While the rolls are baking, whisk together the powdered sugar, real maple syrup, milk, and a pinch of salt until smooth.
Glaze and Serve: Let the rolls cool for about 10 minutes before drizzling the maple glaze over the top. Serve warm and enjoy the gooey, maple-flavored goodness!
Tips for Success:
Make Ahead: You can prep the rolls the night before, cover, and refrigerate. Make sure you have let the rolls rise until they are double in size before refrigerating to keep them fluffy. In the morning, let them come to room temperature and rise a bit longer before baking (2-3 hours on the counter or 45 minutes in a bread-proofing oven.)
Use Real Maple Syrup: The deep flavor of real maple syrup makes all the difference.
Don’t Skip the Heavy Cream: This is what makes the rolls ultra-soft and gooey, creating a caramel-like layer.
A Guide to Transitioning Chicken Pullets from the Brooder
Raising baby chicks has been one of the most rewarding parts of homesteading for me, but figuring out the right time to move those growing little ones outside from their cozy brooder to the big world of the chicken coop can be nerve-wracking. Over the years, I’ve learned (sometimes the hard way) that the timing is key. You want your pullets (young hens) to be comfortable, safe, and well-prepared for the elements and their new life outside.
Here’s what I’ve found to be the best approach when deciding when and how to transition your pullets from their warm indoor space to the great outdoors.
When Are Pullets Ready to Move Outside?
Knowing when your pullets are ready to move outside depends on a few things: their age, feathering, outdoor temperatures, and the safety of your coop setup. Let me walk you through what I’ve learned from my own experience.
Age and Feather Development
Chicks are usually ready to move outside at around 6 to 8 weeks old, but what really matters is their feather development. I remember being so eager to move my first batch of chicks outside that I almost jumped the gun. But they weren’t fully feathered yet, and it would have been too cold for them to handle. Lesson learned! Fully feathered means they’ve grown their adult feathers and can better regulate their body temperature.
Look for that full set of feathers before considering the move. If you see baby down (like in the picture below), they’re not ready yet.
Outdoor Temperature
Even with all their feathers, you want to be sure the nighttime temperatures are warm enough. I usually wait until the nights are consistently above 60°F (15°C). I once tried moving pullets out when it was still dipping into the low 50s at night, thinking they’d be fine since they had feathers. But I ended up sneaking out to the coop in the middle of the night to bring them back inside because they were huddling and cold!
I personally don’t use heat lamps because they can be dangerous—especially in wooden coops. Instead, I recommend using a brooder plate, heating plate, or even heated roosting posts to provide gentle, safe warmth for your pullets if needed.
Coop Setup and Safety
Before moving chicks outside, make sure your coop is ready to welcome them. I can’t stress this enough: your coop needs to be predator-proof. I lost a few pullets early on because I didn’t properly secure the coop. Now, I use hardware cloth instead of chicken wire to close up any gaps where predators like raccoons might try to get in. It’s also worth double-checking your coop’s ventilation and making sure you’ve got good bedding in place.
If your coop has a run, make sure it’s well-covered and secure. Pullets are small and can easily be preyed on by hawks or other predators. Be sure the run is escape proof. It’s for their safety, not to keep them locked up. These little ones are sneaky and can get out through much smaller openings than the bigger hens. When they get loose, it can be an adventure trying to get them back into the pen.
Flock Integration
If you already have an established flock, introducing your pullets can be tricky. I once made the mistake of tossing my new pullets into the coop without a proper introduction, and let’s just say, it didn’t go well. Older hens can be bullies as they assert the pecking order.
The typical approach is to section off part of the run or use a chicken wire divider so the older hens can see the pullets without being able to peck at them. After about a week, they’ll be more familiar with each other, and the integration should go smoother.
Or, you can choose to let your chicks grow into pullets alongside the rest of your birds. But, never just toss new chicks in without protection; set up a rabbit hutch inside your main coop. The babies will be able to grow up safely, since the bigger chickens can’t get to them. Once they are big enough to be set free, they will already have been accepted as part of the main flock’s daily life. Read more about how I set up a rabbit hutch to work as a chick brooder here.
Quick Steps to Transition Pullets Outside
So let’s sum up. Here are the four key steps I’ve taken to successfully move my chicks outside in the past:
1. Gradually Reduce Brooder Heat
About a week before I plan to move the chicks outside, I start reducing the heat in their brooder. If you’ve been using a brooder plate, gradually lower it to help them adjust to cooler nights. This helps them acclimate to the outdoor conditions. I didn’t do this with my first flock, and they struggled a bit with the cold at first.
2. Introduce the Coop During the Day
I always like to start by letting the pullets explore the outdoor coop during the day. It gives them a chance to get used to the space without the stress of a cold night. After a few days, they’re usually more confident and familiar with their new home, making the nighttime transition easier.
3. Move Them Out at Night
After a few days of daytime exploring, I move them to the coop overnight. The first night, I won’t lie—I’m always a bit anxious! I check on them (probably too much), but they generally settle in just fine.
4. Monitor Their Behavior
For the first few nights, I keep a close eye on them. If they seem huddled together for warmth, I’ll make sure their brooder plate or heated roosting post is working well. But usually, by the time they’re fully feathered and it’s warm enough, they do just fine.
What to Watch For After Moving Them Outside
Once your pullets are in the coop, watch for signs that they’re adjusting well. Here are a few things to look out for:
Huddling together at night: This can be a sign that they’re cold. Make sure they have enough bedding, and consider using a brooder plate or heated roosting post if needed.
Pecking and aggression: It’s normal for the older hens to peck a bit as they establish the pecking order, but if it turns into constant bullying, you may need to separate them temporarily.
Feather loss or stress: Keep an eye on their feathers and energy levels. If they seem overly stressed, it might be worth giving them a bit more time in their separate area before full integration.
What to Do If a Pullet Gets Injured when Joining the Flock
Unfortunately, accidents can happen during the transition, whether it’s due to pecking from older hens or just rough play among the pullets. Separate an injured chicken if the others are hurting her.
Clean then cover her wounds before exposing her to the other chickens again, or they will peck at the open sores. I always keep Rooster Booster Pick No More on hand for these situations. This product is a lifesaver when it comes to protecting an injured pullet’s wounds from further pecking by the flock. The bitter taste discourages other chickens from pecking at the injury, which helps prevent infection and allows the pullet to heal.
Essentials for the Transition
From my own experience, having the right supplies can make the transition easier for both you and your pullets. You pick up these supplies at your local farm store, or stock up before there is a problem by using my Amazon Affiliate links. Here’s what I recommend having ready:
Chicken First Aid Kit
Assemble an emergency first aid kit for your chickens. Make sure to include Vetericyn Plus Poultry Care Spray – it’s sort of like a spray-on Neosporin for chickens. Also pick up Rooster Booster Pick No More. After you clean the wound, you will use Pick No More to cover it like a liquid Band-aid. This product helps prevent further pecking at open sores and keeps the injured pullet safe while they heal. I can’t take credit for this tip, my dear friend at Stealin’ Blue Minis told me about this magical chicken medicine. And she was right! Look, the injured chicken shown above grew into a healthy member of the flock:
Heating for Chickens and Pullets
If the nights are still chilly, a brooder plate, heat mat, or heated roosting post is a safer alternative to heat lamps. I never use heat lamps because of the fire risk, so having one of these options helps keep my pullets warm without the danger.
Final Thoughts
Moving pullets outside is a big step, and it can feel a little nerve-wracking the first time. But if you take the time to ensure they’re ready—fully feathered, temperatures are warm enough, and your coop is secure—it will go smoothly. With the right supplies and a gradual transition, your pullets will thrive in their new outdoor space. And don’t forget, if you need to stock up on essentials for your coop, check out my Amazon Affiliate recommendations page to get everything you need for a safe, successful move!
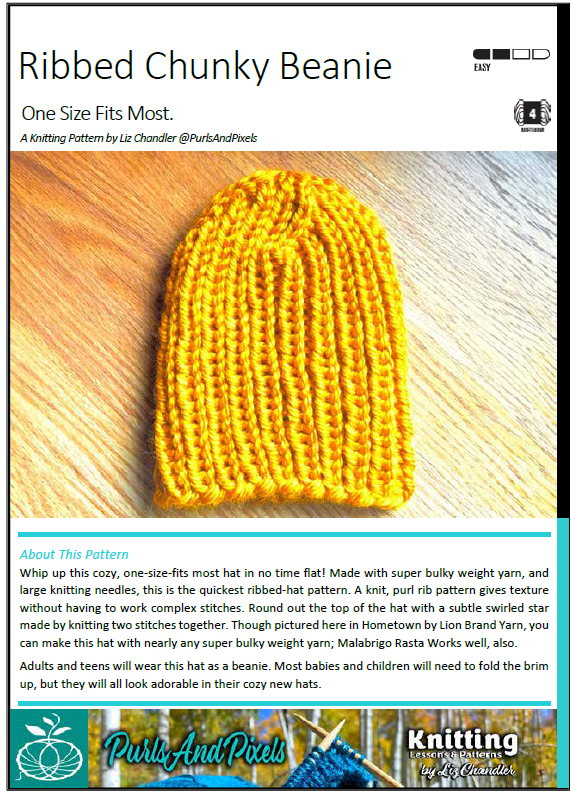
Use this Ribbed Chunky Hat Free Knitting Pattern to make warm hats for everyone! Whip up this cozy, one-size-fits most hat in no time flat! Made with super bulky weight yarn, and large knitting needles, this is the quickest ribbed-hat pattern. A knit, purl rib pattern gives texture without having to work complex stitches. Round out the top of the hat with a subtle swirled star made by knitting two stitches together. Though pictured here in Hometown by Lion Brand Yarn, you can make this hat with nearly any super bulky weight yarn; Malabrigo Rasta and Wool Ease Thick & Quick by Lion Brand work well, also.
Adults and teens will wear this hat as a beanie. Most babies and children will need to fold the brim up, but they will all look adorable in their cozy new hats.
Prefer to knit offline?
This pattern is free to read below, but if you’d rather print it or save it for later, I’ve created a clean, ad-free PDF version for you.
Ribbed Chunky Hat Free Knitting Pattern Instructions
(One Size Fits Most)
Use the Long-Tail Cast On method. Knit in the round.For Double Point Needles, follow DPNinstructions written in italics. For circular needles, follow instructions written in bold. On long circular needles, follow the Magic Loop instructions. Or, for this size, you can substitute short (16-inch) circular needles to knit in the round without the Magic Loop; you will need to switch to DPNs or the Magic Loop to complete the decreases at the top of the hat. If desired, use a stitch marker to keep track of the beginning/ends of your rows/rounds by placing it between the last and first stitch of each row/round.
[Using No. 13 DPNs or long circular needles or short circular needles] Row 1: Cast on 40 stitches. Divide onto 3 DPNs (14 on 1st, 12 on 2nd, and 14 on 3rd DPN). Or separate stitches on long circular needles for Magic Loop (20 on each side). Or place all cast on stitches onto short circular needles. (40 stitches)
Row 2: Join the round (taking care not to twist stitches) and *k, p* x 20. (40 stitches)
Rows 3 – 21: *k, p* x 20. (40 stitches) {Work should measure 6.5 inches (14 cm) at this point.}
[Begin decreases.] Row 22: *(*k, p* x 3), k2tog* x 5 (35 stitches).
[Switch to No. 13 DPNs or long circular needles] Row 23: *(*k, p* x 2), k 1, k2tog* x 5 (30 stitches).
Row 24: *(*k, p* x 2), k2tog* x 5 (25 stitches).
Row 25: *k, p, k, k2tog* x 5 (20 stitches).
Row 26: *k, p, k2tog* x 5 (15 stitches).
Row 27: *k, k2tog* x 5 (10 stitches).
Cut yarn, leaving an 8-inch (20.32-cm) tail. With a darning needle, draw yarn tightly through remaining 10 stitches. Weave in ends. Block if desired.
A free chunky ribbed hat pattern that is so simple and fast you’ll want to knit one for everyone. 🧶
Size Notes
This Ribbed Chunky Hat Knitting Pattern will create a one-size fits most beanie hat. If it is too big, fold the brim up and it should fit nicely.
Care
If you use the materials called for in the Ribbed Chunky Hat Free Knitting Pattern, your final product will be machine washable. To keep your hat looking its best, hand wash or machine wash separately on delicate cycle in cold water. You may tumble dry on low heat or lay flat to dry.
This pattern is for personal use, gifting, and charitable donation of completed items. You may also sell handmade items created using this pattern. Do not copy this pattern and distribute it. If you’d like to share the pattern, refer your friends to my website, purlsandpixels.com so they may obtain a copy.
If you find any errors or have any questions, email purlsandpixels@gmail.com and I will do my best to help.
I’d love to see your finished work! Tag your photos with @PurlsAndPixels on Twitter or Instagram.
Love cozy knitting projects? Join me on YouTube, Pinterest, and Instagram! And don’t forget to sign up for my newsletter to get more free patterns, helpful tips, and updates straight to your inbox. 💌
Knitting in the round is a way of creating seamless tubes of fabric without having to sew anything together. There are several ways of knitting in the round, but the three key methods are using double point needles, using circular needles, or working in the “Magic Loop.”
Knitting in the Round on Double Point Needles (DPNs)
To knit in the round with DPNs, you will use three or four needles (with points on both ends) to work in a triangle or square shape. Once it comes off the needles, this knit will be a round tube. DPNs are great for making smaller items like mittens, cup holders, socks, and sweater sleeves.
Circular needles have two pointy ends connected by a flexible cord. This setup allows you to bring your needle tips together and join the ends of your cast on. Then, you can work around and around creating a seamless knit tube.
For the “Magic Loop,” you will also use a circular needle; however, you will bend the cord into a shape that allows you to knit smaller tubes. This technique is excellent when you need to knit smaller items but circular needles in that size are not available. For example, tiny mittens are far too small to make on traditional knitting needles. The Magic Loop method gives you the ability to make theses tiny things.
Introducing Liz Chandler’s Knitting Journals, a collection of meticulously designed notebooks tailored to enhance your knitting experience. Each journal features a unique high-gloss hardcover, allowing you to choose a design that resonates with your personal style. Both beautiful and functional, these journals offer a consistent and practical interior layout. They will give you a structured space to document your knitting projects, patterns, and creative ideas.
All Knitting Journals Feature:
Numbered Table of Contents Effortlessly reference your patterns with a pre-organized, numbered table of contents. No more flipping through pages in search of specific projects.
Notes and Big Ideas Section: A dedicated space to jot down your knitting musings and brainstorm new ideas. This area is perfect for capturing those spontaneous moments of inspiration.
Comprehensive Pattern Sections: Each pattern is allocated its own section. You can neatly list the pattern name, required materials (yarn, needles, and other essentials), and special notes alongside your sketches.
Graph Paper Pages: Visualize intricate designs and experiment with colorwork using the included graph paper pages. Create your personalized knitting blueprints.
Instruction Pages: A roomy instructions page allows you to write out detailed notes. Try writing your instructions row-by-row to keep it very clear.
Durable Hardcover: The sturdy, high-gloss hardcovers not only protects your precious knitting plans, but also add a touch of sophistication. The knitting themes remind you exactly what use these notebooks serve. They won’t blend into the rest of your notes!
Available Cover Designs:
Each journal in this collection features a distinct cover design, allowing you to select one that reflects your knitting personality:
Kitten’s Sweater: Adorned with an adorable image of a kitten attempting to knit, this cover brings a playful touch to your journaling experience. Get the Kitten’s Sweater Knitting Journal
Alpaca Fields: Featuring a serene alpaca grazing in lush fields where the haybales are made of yarn, this adorable design evokes a sense of calm and connection to nature. Get the Alpaca Fields Knitting Journal
In Stitches: Showcasing a vibrant purple knitted pattern, this cover adds a pop of color and celebrates the beauty of stitches. Get the In Stitches Knitting Journal
Fuzzy Blanket: Inspired by the warmth and comfort of a cozy blanket, this design invites you to wrap yourself in creativity. Get the Fuzzy Blanket Knitting Journal
Winter Wonderland: Depicting a tranquil snowy landscape, this cover captures the essence of knitting during the cozy winter months. Get the Winter Wonderland Knitting Journal
In the Garden: Illustrating a lush garden scene, this design brings the freshness of the outdoors into your knitting space. Get the In the Garden Knitting Journal
Not Just Pages of Lined Paper
Liz Chandler’s Knitting Journals are more than just notebooks. With 126 pages designed to accommodate up to 30 knitting patterns or projects, they’re your co-pilots in the knitting universe. They simplify your projects, spark your creativity, and keep everything organized. Transform every knitting season into a smooth and creative journey.
Whether you’re in your garden or cozied up indoors, these journals are ready to accompany you on your knitting adventures. Embrace the joy of knitting with Liz Chandler’s Knitting Journals and keep your creative process as warm and comforting as the projects you create.