Knitting Tension

Learn to fix loose stitches to improve your knitting tension - a lesson from Liz Chandler @PurlsAndPixels.

Maintaining yarn tension in your knitting is essential to keeping your stitches even. If you do not place your yarn loops on the needles evenly, your knitting work will end up irregular, saggy, or filled with holes. To prevent these knitting problems, practice wrapping each stitch around your needles with the same tightness or “tension.” Making sure all your stitches match one another will help your final knitting to look even and consistent.

Pay close attention to how your stitches wrap around the needles. Ideal knit stitches are looped with just enough tension that they fit around the needle with no gaps. On the other hand, stitches should not be pulled so tightly that the loops get stuck in place; if your stitches cannot slide down the needles easily, you will have a hard time working into them.

How tightly you knit can greatly impact your finished object. If you do not have the correct tension, you can end up with very differently sized knit pieces, even when knitting with the same yarn and needles. Loose tension will create larger stitches, while tight tension creates smaller stitches.

Below you’ll find video and written guides, which I hope will help you improve your knitting tension.

Video Guide: Knitting Tension

Written Guide: Knitting Tension

Practicing different yarn holds can help you with your knitting tension. Try holding the yarn in several ways, wrapping it around your hand or fingers until you find a comfortable option to keep your string taut.

Find a comfortable yarn hold to help you improve your knitting tension - knitting lessons from Liz @PurlsandPixles - a knitting lesson from Liz @PurlsAndPixels

With each stitch, try to ensure that you loop the yarn around the knitting needle snuggly. Take care not to knit your loops too tightly, however, or you will have trouble inserting your needle into the stitches for the next row. The key to knitting tension is to place each stitch on the needles in with the same moderate tautness: not too tight and not too loose.

Another way to maintain even tension is to keep a close eye on the stitches that you have just worked. If you notice a stitch on your needles that is too loose, you can adjust that stitch before you knit further. A loose stitch on your needles can be tightened by pulling the excess yarn back towards the yarn ball, one stitch at a time.

Improving Tension by Adjusting Stitches as You Go

Step 1: How to keep even knitting tension by fixing loose stitches as you go - a knitting lesson from Liz @PurlsAndPixels

Adjust a Loose Stitch, Step 1:

Identify the loose stitch by noticing that it sticks out from the righthand needle a bit more than the other stitches.

Step 2: How to keep even knitting tension by fixing loose stitches as you go - a knitting lesson from Liz @PurlsAndPixels

Adjust a Loose Stitch, Step 2:

Gently pull on the first stitch to the left of the loose stitch; this will tighten the loose stitch, while loosening the stitch on which you are pulling. Once you have achieved the desired tightness in the loose stitch, let go of the stitch you just pulled.  

Step 3: How to keep even knitting tension by fixing loose stitches as you go - a knitting lesson from Liz @PurlsAndPixels

Adjust a Loose Stitch, Step 3:

Pinch the next stitch to the left and gently pull it to tighten up the previous stitch. Continue gently pulling the stitches, one at a time, moving toward your left. Ensure you are tightening the previous stitches to the correct tension as you go.

Step 4: How to keep even knitting tension by fixing loose stitches as you go - a knitting lesson from Liz @PurlsAndPixels

Adjust a Loose Stitch, Step 4:

When you reach the last stitch on your righthand needle, pull the working yarn to tighten the last stitch to the correct tension. The loose stitching should be fixed, and you can resume knitting your pattern.

Practice With My Knitting Patterns

Simple Washcloth Knitting Pattern Collection from Liz @PurlsAndPixels

If you’ve been following my lessons, you now have enough information to knit all of the washcloths and face scrubbies in my Simple Washcloth Knitting Pattern Collection. Happy knitting!

Learn to fix loose stitches to improve your knitting tension - a lesson from Liz Chandler @PurlsAndPixels.

Up Next

Learn to spot and fix simple knitting mistakes with this lesson from Liz Chandler @PurlsAndPixels.

Everybody makes mistakes. In the next lesson, we will learn how to spot and fix some of the most common knitting mistakes: twisted, sipped, and dropped stitches.

Go Back to the Learn to Knit Index

How to Make the Knit Stitch

Learn to make the knit stitch, a free knitting tutorial from Liz @PurlsAndPixels.

Once you have cast on your first stitches, you will be ready to begin your first knit stitch row.

The abbreviations “k” or “K” are often used in patterns to instruct you to make the knit stitch.

Two important things to remember when making the knit stitch:

  1. Hold the working yarn behind your needles, and
  2. Insert your right needle into each stitch from front to back.

There are different styles of knitting, the most common of which are Continental and English style knitting. Both styles of knitting give you the same knitted piece at the end, but they differ in how you hold your yarn. Here, you’ll learn how to knit in the Continental style. I like Continental style knitting because it is quicker to make the knit stitch once you have practiced.

Below are both video and written tutorials to help you learn how to make the knit stitch.

Video Guide: How to Make the Knit Stitch

Written Guide: How to Make the Knit Stitch

Step 1: Learn to make the knit stitch, with a free knitting lesson from Liz @PurlsAndPixels.

Knit, Step 1:

After turning your work, arrange the working yarn onto your left hand in your preferred yarn hold. Hold the empty needle in your right hand.

Step 2: Learn to make the knit stitch, with a free knitting lesson from Liz @PurlsAndPixels.

Knit, Step 2:

Place the working yarn (coming from your yarn ball) behind your left needle.

Step 3: Learn to make the knit stitch, with a free knitting lesson from Liz @PurlsAndPixels.

Knit, Step 3:

Insert the tip of your right-hand needle into the front loop of the first stitch on your left needle.

Step 4: Learn to make the knit stitch, with a free knitting lesson from Liz @PurlsAndPixels.

Knit, Step 4:

Bring the right needle tip over the working yarn and begin to form a counterclockwise loop around it.

Step 5: Learn to make the knit stitch, with a free knitting lesson from Liz @PurlsAndPixels.

Knit, Step 5:

Pull the loop on your right needle tip through the stitch on your left needle.

Step 6: Learn to make the knit stitch, with a free knitting lesson from Liz @PurlsAndPixels.

Knit, Step 6:

Slide the stitch you have just worked into off your left needle, allowing the new stitch to remain on your right needle. You have made your first knit stitch!

Repeat steps one through six to knit an entire row off your left needle and onto the right. When the left needle is empty, you can turn your work again and start the next row.

This pattern, of using only knit stitches and turning after each row, is known as the Garter Stitch. It is used in many knitted projects.

Learn to make the knit stitch, a free knitting tutorial from Liz @PurlsAndPixels.

Practice With My Free Knitting Patterns

Free Beginner Face Scrubby knitting pattern by Liz @PurlsAndPixels.

Knit along with me and practice your knit stitches with my Free Beginner Face Scrubby Pattern.

Simple garter stitch scarf easy beginner scarf knitting pattern by Liz @PurlsAndPixels

If you are looking for a bigger project, my Free Beginner Knit Scarf Pattern is also made in garter stitch (all knit stitches). It is just as simple as my face scrubby pattern; it just takes a bit longer to make.

Up Next

Learn how to make the purl stitch, a knitting lesson from Liz @PurlsAndPixels.

After mastering the knit stitch, you will be ready to learn the purl stitch and start adding texture and patterns to your knitting projects.

Go Back to the Learn to Knit Index

Beginner Knit Scarf Easy Free Knitting Pattern

A Knitting Pattern from Liz @PurlsAndPixels

Simple beginner scarf, free knitting pattern from Liz @PurlsAndPixels

My Beginner Knit Scarf Free Easy Knitting Pattern is a great place to start to learn knitting. Below are three patterns. One is for an extra wide scarf – 9 inches in width. The second is for a standard size scarf – 7 inches in width. Plus, find my free mini ornament scarf knitting pattern (great for toys, decorations, or just knitting practice)!

Prefer to knit offline?

This pattern is free to read below, but if you’d rather print it or save it for later, I’ve created a clean, ad-free PDF version for you.

  • Includes all three scarf sizes
  • Easy to print or use on your tablet
  • Supports my small business 💖

Knitting a Beginner Scarf

These knitting patterns are for a simple scarf in garter stitch – a stitch made up completely of the basic knit stitch. This simple scarf pattern requires knowledge of a cast-on, the knit stitch, and a bind off. Practice makes perfect, so repeating the knit stitch as you do in this pattern is a wonderful way to work on your tension, accuracy, and speed.

Whether you are an absolute beginner, or you are trying to master knitting tension, this is a great way to improve your knit stitch. Remember to try and keep all your loops on the needles evenly and tightly, but not so tightly that they don’t slide down the needles. You want to be able to insert your needle into them when you try to knit the next row, so try to find a balance between too tight and too loose.

Want to knit along with me? I’ve created a video lesson, showing you how I make the mini scarf from start to finish. Visit the How to Knit a Scarf Lesson for step-by-step guidance. 🧣

Learn to knit a simple, classic scarf. This knitting pattern is perfect for beginners. Get the free instructions from Liz Chandler @PurlsAndPixels.

About this Knitting Pattern

This easy garter stitch scarf pattern is a beginner level knitting pattern and is great for those just learning the knit stitch. It is also a relaxing pattern for knitters of more advanced skill levels. It will not take much concentration to create this adorable scarf once you’ve mastered the knit stitch. 🧶

Materials

Two (2) 315-yard/6 ounce skeins of Caron Simply Soft yarn in your choice of color (pictured here in Dark Country Blue).

  • one standard scarf uses 304.5 yards (5.8
    ounces)*
  • one extra-wide scarf uses 420 yards (8
    ounces)*

*Weights estimated with Caron Simply Soft yarn; other yarn weights may vary.

36-inch (91 cm) long US No. 8/5MM circular needle or 9-inch (23 cm) long US No. 8 (5 mm) straight needles (or size needed to obtain gauge)

Measuring Tape

Tapestry needle (to weave in ends)

Gauge

18 stitches and 24 rows = 4 x 4 inches in stockinette stitch on No. 8 (5.0 mm) needles.

Instructions: Extra-Wide Beginner Scarf

(9 inches x 6 feet or [2.7432 cm x 1.8288 m] desired length)

Use the Long-Tail Cast On method. Knit flat, turning after each row.

Row 1: Cast on 40 stitches. Turn.

Row 2: k 40. (40 stitches) Turn.

Repeat Row 2 until scarf measures 6 feet or your desired length.

Bind off loosely knit stitch pattern. Cut yarn, leaving an 8-inch (20.32-cm) tail, and pull through. Weave in ends. Block if desired.

Instructions: Standard-Width Beginner Scarf          

(7 inches x 6 feet [17.78 cm x 1.8288 m] or desired length)

Use the Long-Tail Cast On method. Knit flat, turning after each row.

Row 1: Cast on 32 stitches. Turn.

Row 2: k 32. (32 stitches) Turn.

Repeat Row 2 until scarf measures 6 feet or your desired length.

Bind off loosely in knit stitch pattern. Cut yarn, leaving an 8-inch (20.32-cm) tail, and pull through. Weave in ends. Block if desired.

Instructions: Mini Ornament Beginner Scarf

(1.5 inches x 12 inches [3.81 cm x 30 cm] or desired length)

Use the Long-Tail Cast On method. Knit flat, turning after each row.

Row 1: Cast on 6 stitches. Turn.

Row 2: k 6. (6 stitches) Turn.

Repeat Row 2 until scarf measures 12 inches (30 cm) or your desired length.

Bind off loosely in knit stitch pattern. Cut yarn, leaving an 8-inch (20.32-cm) tail, and pull through. Weave in ends. Block if desired.

Printable version of this free knitting pattern

Get the PDF version of this Beginner Scarf Knitting Pattern.


Care

If you use the materials called for in the pattern, your final product will be machine washable. To keep your scarf looking its best, hand wash or machine wash separately on delicate cycle in cold water. You may tumble dry on low heat or lay flat to dry.

🛁 Read more Knitwear Care Tips

Enjoy your new scarf!

This easy knit scarf pattern for beginners uses only knit stitches to make a classic garter stitch scarf. Pattern from Liz @PurlsAndPixels.

©2014, Liz Chandler of PurlsAndPixels. Revised 2017, 2019, 2022, 2023, 2025.

This pattern is for personal use, gifting, and charitable donation of completed items. You may also sell handmade items created using this pattern. Do not copy this pattern and distribute it. If you’d like to share the pattern, refer your friends to my website, purlsandpixels.com so they may obtain a copy.

If you find any errors or have any questions, email purlsandpixels@gmail.com and I will do my best to help.

I’d love to see your finished work! Tag your photos with @PurlsAndPixels on Twitter or Instagram.

Find More Knitting Patterns

If you like this, check out the other knitting patterns I’ve written. They’re all gathered on one page, which you can find here.

Find all of the knitting patterns by Liz Chandler @PurlsAndPixels.

Go Back to the Learn to Knit Index

How to Cast On Knitting Stitches

Learn to put yarn onto knitting needles. The long tail cast on tutorial from Liz @PurlsAndPixels.

When you begin to knit, you’ll need to learn to put your initial stitches on your needles. In knitting, this is called “casting on” stitches. When reading a pattern, the abbreviations CO, co, or, c/o are often used to mean cast on.

There are several methods of casting on, each of which serves a different purpose. Some cast-ons are decorative, some are stretchy, and the way you put your yarn on your needles can really change the end garment.

For beginners, it is a good idea to start with the “long tail cast on.” This cast on gives you a stretchy – but not too stretchy – end for your work. It also ends up looking clean and neat if you ensure that your put each stitch equally tightly (with even tension) on your needle. I use the long tail cast on for almost all of my basic garments, like scarves, hats, and mittens.

Below are both video and written tutorials to help you learn how to put your first loops onto your knitting needles with the long-tail cast on. Knit along with me using my Free Beginner Face Scrubby Pattern.

Video Guide: How to Cast On Knit Stitches

Written Guide: How to Cast On Knit Stitches

Step 1: Learn to cast on your first knit stitches. Putting yarn onto knitting needles for beginners with Liz @PurlsAndPixels.

Cast On, Step 1:

Pull approximately one inch of yarn per stitch you plan to cast on out of the ball of yarn. For example, if you want to cast on 14 stitches, pull roughly 14 inches of yarn out of the ball.

Step 2: Learn to cast on your first knit stitches. Putting yarn onto knitting needles for beginners with Liz @PurlsAndPixels.

Cast On, Step 2:

Make a slipknot at this point in the yarn, then place it on a knitting needle held in your right hand. (Note: This slipknot will count as your first cast-on stitch.)

Step 3: Learn to cast on your first knit stitches. Putting yarn onto knitting needles for beginners with Liz @PurlsAndPixels.

Cast On, Step 3:

Bring your left hand under the slipknot, with the working yarn above your hand and the yarn tail below your hand. Drape the working-yarn side between your left pointer finger and left middle finger.

Step 4: Learn to cast on your first knit stitches. Putting yarn onto knitting needles for beginners with Liz @PurlsAndPixels.

Cast On, Step 4:

Drape the tail side of the yarn over your left thumb.

Step 5: Learn to cast on your first knit stitches. Putting yarn onto knitting needles for beginners with Liz @PurlsAndPixels.

Cast On, Step 5:

Keeping the yarn draped over your thumb and pointer finger, turn your left hand so you can see your palm; the working yarn should lie over your left-hand middle, ring, and pinkie fingers. Keep the slipknot from falling off your needle by gently holding it in place with your right pointer finger.

Step 6: Learn to cast on your first knit stitches. Putting yarn onto knitting needles for beginners with Liz @PurlsAndPixels.

Cast On, Step 6:

With your left ring and pinkie fingers, pinch the two strings that now drape over your left palm. Bring the tip of the knitting needle in front of your left thumb nail. You should now be holding the yarn properly to allow you to make your first cast on stitch.

Step 7: Learn to cast on your first knit stitches. Putting yarn onto knitting needles for beginners with Liz @PurlsAndPixels.

Cast On, Step 7:

Insert the tip of your knitting needle under the yarn at the base of your left thumb.

Step 8: Learn to cast on your first knit stitches. Putting yarn onto knitting needles for beginners with Liz @PurlsAndPixels.

Cast On, Step 8:

Bring the tip of the needle over both the strands of yarn behind your left thumb.

Step 9: Learn to cast on your first knit stitches. Putting yarn onto knitting needles for beginners with Liz @PurlsAndPixels.

Cast On, Step 9:

With your needle, grab the yarn at the base of your left pointer finger by bringing the needle over the strand, then down toward your thumb.

Step 10: Learn to cast on your first knit stitches. Putting yarn onto knitting needles for beginners with Liz @PurlsAndPixels.

Cast On, Step 10:

Pull the loop you have created over the strand coming from behind your left thumb and under the strand in front of left your thumb.

Step 11: Learn to cast on your first knit stitches. Putting yarn onto knitting needles for beginners with Liz @PurlsAndPixels.

Cast On, Step 11:

You should now have a new stitch on your needle and a loop around your left thumb; gently remove your thumb from the stitch, while continuing to clasp the loose ends of your cast on with your left ring and pinkie fingers.

Step 12: Learn to cast on your first knit stitches. Putting yarn onto knitting needles for beginners with Liz @PurlsAndPixels.

Cast On, Step 12:

Place your left thumb back under the yarn tail that now comes from your second cast on stitch. Use this thumb to pull the stitch tighter (but not too tight) onto your knitting needle.

Step 13: Learn to cast on your first knit stitches. Putting yarn onto knitting needles for beginners with Liz @PurlsAndPixels.

Cast On, Step 13:

Rotate your hand back into position to cast on another stitch by turning your left palm toward you while still holding the working yarn and yarn tail with your left ring and pinkie fingers.

Cast On, Step 14:

Repeat steps 7 through 13 until you have cast on all the stitches your pattern requires. **Remember, your slipknot counts as your first stitch.**

Practice Your Cast On With My Free Knitting Patterns

Free Beginner Face Scrubby knitting pattern by Liz @PurlsAndPixels.

The easiest and fastest knitting pattern to learn with is my Free Beginner Face Scrubby Pattern. It is short and you will have a finished object more quickly.

Simple garter stitch scarf easy beginner scarf knitting pattern by Liz @PurlsAndPixels

If you would rather try a longer pattern, my Free Beginner Scarf Pattern is suitable for absolute beginners, as well. Because it has more stitches in the pattern, it will take longer than a scrubby to finish.

Learn to put yarn onto knitting needles. The long tail cast on tutorial from Liz @PurlsAndPixels.

Up Next

Learn how to turn your work in this beginner knitting lesson from Liz @ PurlsAndPixels.

If your are making a flat piece, like the Face Scrubby or Scarf, you will need to turn your work next. Find out what that means here.

Go Back to the Learn to Knit Index

Knitting Materials, Choosing Yarn & Needles for Beginners

Learn about choosing your first knitting materials in this lesson with Liz Chandler @PurlsAndPixels.

Gather Your Knitting Materials

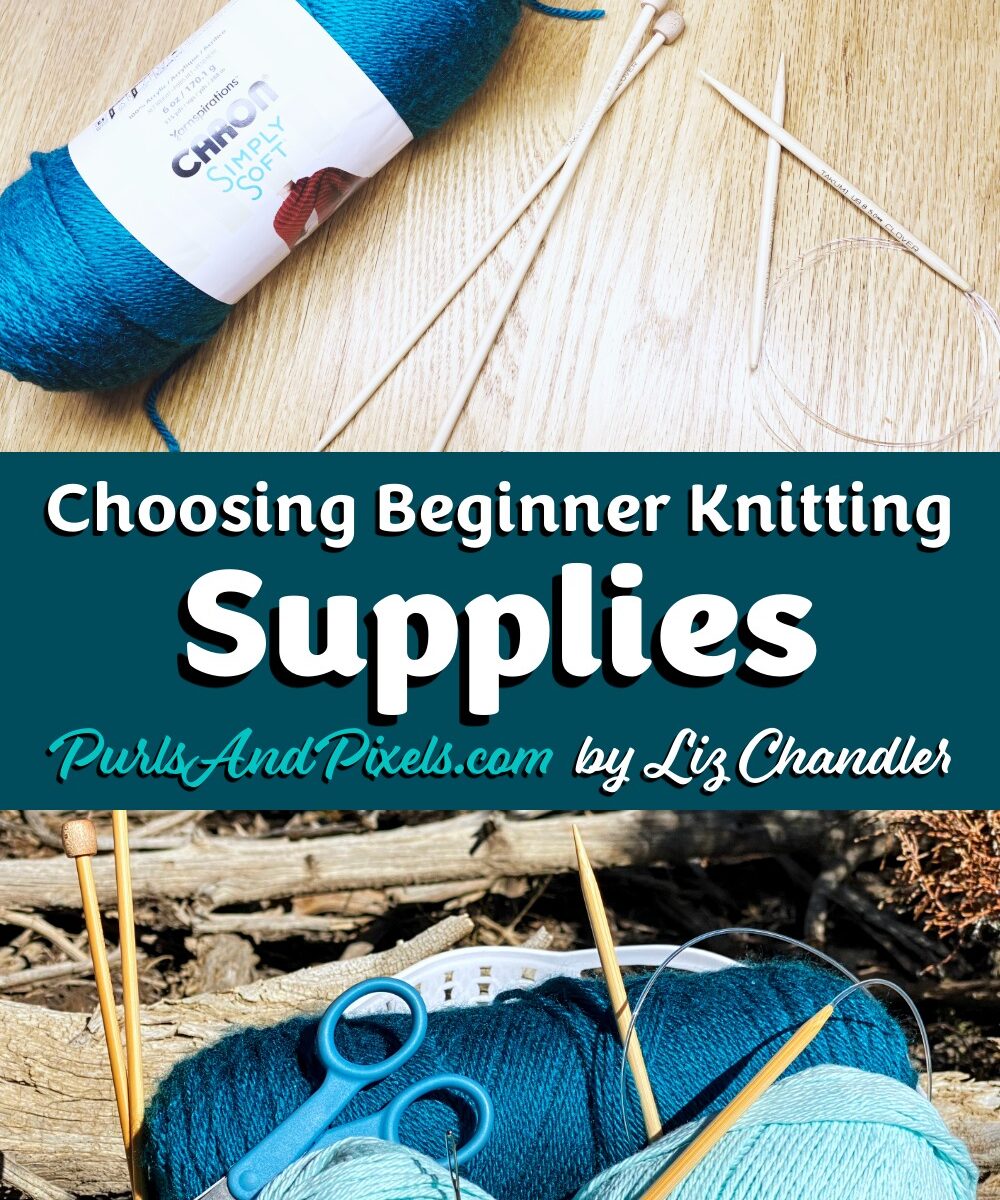
Before you can start knitting, you will need to collect a few things. Naturally, you will have to pick out yarn and knitting needles. There are also several small tools you will want to have available when making most projects, including scissors, darning needles, and stitch markers. Find a complete supply list of beginner knitting materials at the end of this page, or read about how to pick out your supplies in the individual lessons below.

Yarn

Of course, you will need yarn for your knitting project. This lesson will teach you about “yarn weight” and yarn materials. Then, you will be able to choose the correct yarn for your knitting project. Read more about choosing yarn for knitting here.

Learn how to choose yarn for beginner knitters in this knitting lesson from Liz Chandler @PurlsAndPixels.

Knitting Needles

Next, you will need a set of knitting needles. This lesson will teach you about knitting needle types and sizes. Then it will help you select a great set of beginner knitting needles. Read about choosing knitting needles here.

Learn how to choose knitting needles for beginners in this knitting lesson from Liz Chandler @PurlsAndPixels.

Knitting Tools

Finally, you will need a few odds and ends to get started. In your knitting tool bag, you will need at least sewing scissors and a darning needle to get started. Later, you will want to pick up stitch holders and stitch markers. Read about the knitting tools you might need as a beginner here.

Learn to choose beginner knitting materials in this lesson with Liz Chandler @PurlsAndPixels.

Materials for Your First Knitting Project

In most knitting patterns, you will see a “materials” section, which lists the specific tools you will need to make each project. When in doubt about what yarn or tools to get, always check your pattern for a supply list.


Supplies to Knit a Face Scrubby

If you follow along with my Learn to Knit Guide, you will start by learning to knit a Beginner Face Scrubby. Before you can cast on your first stitches, you will need to pick up the supplies below. You can order them through Amazon with the Affiliate links below, or pick them up at your local shop.


Supplies to Knit a Scarf

If you want to invest a little more time in your first knitting project, a Beginner Knit Scarf is made in the same way as a Face Scrubby, but it is larger. If you’d rather start learning to knit with a scarf, you will need the following supplies (Amazon affiliate links below):


DIY gift idea for the aspiring knitter

Quick DIY gift set - learn to knit gift basket - guide from Liz @PurlsAndPixels

Know someone who wants to learn to knit? Make them a homemade do-it-yourself gift. Gather the knitting materials listed above in a pretty box or bag to make a learn-to-knit gift-set. They will be happily knitting away in no time! Get a printable gift card and read more about how to make a learn to knit box for a gift here.


Learn how to pick out your first knitting supplies in this lesson with Liz Chandler @PurlsAndPixels.

Up Next

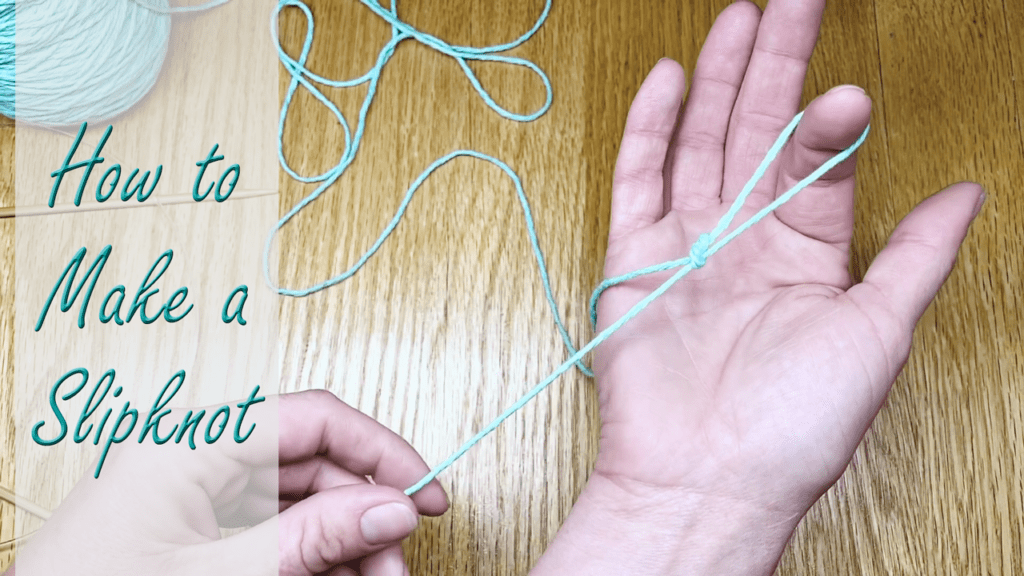
Once you’ve picked up your knitting supplies, you can start learning to knit! The first step is to make a “slipknot” in your yarn. The next lesson will show you how.

Learn to make a slip knot then put it on a knitting needle, a knitting lesson from Liz @PurlsAndPixels.

Go Back to the Learn to Knit Index

Learn to Knit – Index

Learn to Knit Online with Free Knitting Lessons from Liz Chandler @PurlsAndPixels

So you are ready to learn to knit. That is great! Making things from yarn is an incredibly fulfilling hobby. You can create cozy clothing, handmade accessories, beautiful home decor, and thoughtful gifts from just a ball of yarn and a little time. Here, you will find free online knitting lessons, tips, tutorials, how-to videos, and patterns to get you started.

Knitting does not need to be overwhelming. Whether you are a total beginner or picking your needles back up to try something new, you will find clear, friendly lessons here to guide you every step of the way.

📘 Prefer Learning with Books?

I have written a complete beginner’s guide to knitting, full of structured lessons and patterns. You can order Liz Chandler’s Knitting Guide: Learn to Knit with Practical Patterns in hardcover or ebook format. It includes 526 pages with full tutorials and 15 practical projects with 65 variations!

🧶 Choosing a Knitting Style

First things first, you’ll want to choose a knitting style. Before you start, decide how you want to hold your yarn. I teach Continental knitting, which means you hold the working yarn in your left hand. It is often faster and more ergonomic for some knitters, but what matters most is what feels comfortable to you. There is no wrong way to knit if your results make you happy.

Learn to knit with free knitting lessons from Liz Chandler @PurlsAndPixels.

💡 New to Knitting? Start Here

  • Go step-by-step. You do not need to master everything in one day.
  • Mistakes are normal. In fact, they are how we learn.
  • You will surprise yourself. The first stitch is the hardest, and it gets easier from there.

Want to track your progress? Download the Knitting Skills Progress Sheet to check off each new skill as you go.

The Learn to Knit Index

Use this section as your learning roadmap. These lessons follow a beginner-friendly sequence and include both written instructions and videos.

🧵 Step One: The Basics

Learn how to pick out your first knitting supplies in this lesson with Liz Chandler @PurlsAndPixels.

Choose Knitting Materials

How to Make a Slipknot

Putting the First Stitches on Knitting Needles – Learn to Cast On

Turn Your Work

How to Hold Yarn When Knitting

Learn to take knit stitches off needles with a standard bind off, a knitting lesson from Liz @PurlsAndPixels.

Learn the Basic Knit Stitch

Take Your Work Off the Needles – “Bind Off” Knitting

Weave in and Tie Off Loose Ends on Flat Knits

Put it all together with these simple beginner projects:

➕ Learn to Purl and Combine Stitches

Learn how to bind off in pattern - a knitting lesson from Liz Chandler @PurlsAndPixels

Learn the Purl Stitch

Knits vs. Purls – How to See the Difference

How to “Bind Off in Pattern” – Taking Knits and Purls Off the Needles

Combine Knits and Purls to Make Beginner Knitting Patterns

Reading Knitting Patterns

Understanding Knitting Abbreviations

Following Knitting Patterns

🧶 Knitting Skill Boosters

Learn to spot and fix knitting mistakes with Liz Chandler @PurlsAndPixels.

Improve Your Knitting Tension

Spotting and Fixing Common Knitting Mistakes

“Frog” – Unravel Knitting to Fix Mistakes or Reuse Yarn

Wind Yarn into Center-Pull Balls by Hand

Blocking

Learn How to Make a Gauge Swatch

Learn to slip stitches purlwise to neaten the edges of your flat knits in this knitting lesson with Liz @PurlsAndPixels.

Slip Stitches Purlwise (slpw) – Slip Stitches to Neaten the Edges of Knitting

Knit Thru the Back Loop (ktbl) to Twist Knit Stitches and Add Texture

Slip Stitches Knitwise (slkw) – Slip Stitches to Add Texture

Joining a New Ball of Yarn – The Magic Knot

Switch Needle Sizes on Flat Knits

🌀 Learn to Knit in the Round

Learn to bind off on double point needles (DPNs) while working in the round - a knitting lesson with Liz Chandler @PurlsAndPixels.

What is Knitting in the Round?

Knit in the Round on Double Point Needles (DPNs)

Switch Needle Sizes on Double Point Needles (DPNs)

Bind Off on Double Point Needles (DPNs)

Knit in the Round on Circular Needles

Switch Circular Needle Sizes While Knitting in the Round

Bind Off in the Round on Circular Needles

The Magic Loop – Knit in the Round on Long Circular Needles

Switch Needle Sizes While Knitting in the Magic Loop

🧤 Learn to Shape Your Knitting

Learn how to knit decreases and round the tops of mittens in this knitting lesson with Liz Chandler @PurlsAndPixels.

Decreases

Switch from Knitting on Circular Needles to Knitting on Double Point Needles “DPNs” – Hat Decreases

Switch from Knitting on Circular Needles to Knitting in the Magic Loop – Hat Decreases

Learn to close hat tops in this knitting lesson from Liz Chandler @PurlsAnd Pixels.

Finishing Knit Hats

Increases

Learn how to use "make one increases" to make a glove thumb gusset in this knitting lesson with Liz Chandler @PurlsAndPixels.

Slip Stitches onto a Stitch Holder

Using Scrap Yarn Instead of Stitch Holders

Bind Off in the Magic Loop

Knitting Off Stitch Holders – Making Glove Thumbs on Double Point Needles (DPNs)

Learn to weave in the bind off tail on items you have knit in the round, such as fingerless gloves - a knitting lesson with Liz Chandler @PurlsAndPixels.

Knitting Off Stitch Holders – Making Glove Thumbs in the Magic Loop

Weave in Loose Ends on Fingerless Gloves

Learn to use the yarn tails to finish knit mittens while you weave in your loose ends in this knitting lesson with Liz Chandler @PurlsAndPixels.

Weave in the Loose Ends of Mittens

🧶 Advanced Techniques

Customize Knits

Substituting Yarn – Worsted Weight Recommendations

Yarn Math – Calculating How Much Yarn is Left Over

What is Yarn Chicken?

Learn how to move a hat top from circular needles to Double Point Needles (DPNs) in this knitting lesson with Liz Chandler @PurlsAndPixels.

Switch from Knitting on Double Point Needles “DPNs” to Knitting in the Magic Loop

Switch from Knitting in the Magic Loop to Knitting on Double Point Needles “DPNs”

Knit Two Things, in the Round, at Once

💬 Have Questions?

Leave a comment on any tutorial or visit me on YouTube to see each stitch in action.


🧷 Helpful Knitting Resources

Looking for more ways to support your knitting goals?

Settle in and start your first stitches. You’ve got this!

– Liz

Share this with Friends: