This year the holiday budget was a little tight, so I decided to make everyone cookie baskets for Christmas.
For our nearby friends and family I picked up some round, decorative plastic boxes. I used cupcake papers and aluminum foil to separate the different types of cookies and arrange them nicely.
Packing up bundles of pretty cookies to give as a gift is not too difficult to do when your friends and family are local, but much of my family lives over 2000 miles away. It took a bit of creative packaging, but I was successful at shipping cookie gifts cross-country. Let me show you how I did it so you can ship your on cookie gifts for holidays and care packages.
*If you plan to ship your cookies in the mail, choose cookies that are on the denser and thicker side. Treats that are especially thin or fragile can be tasty, but probably wont make it thru the mail. The cookies pictured held up well in shipping.
For my gift baskets this year, I made gingerbread cookies, snowball cookies, chocolate chip cookies, fudge, and peanut brittle. I’ve pinned all of the recipes for my favorite treats here, so check out and follow my cookie, candy, and crafty eats boards for ideas on home-cooked gifts.
Packaging materials
If you are mailing your cookies, you are going to need a few supplies. You’ll need:
Carefully wrap between 6 and 12 of each type of cookie in cellophane. Next, wrap that bundle of cookies again, this time loosely with in aluminum foil. Gently mold the foil around the cookies to make a block and keep the cookies from sliding around inside the bundle. Place this double-wrapped cookie bundle in a Ziploc bag. Repeat this process with the rest of the cookies that you want to ship. Place them in the shipping box, filling any empty spaces in the box with cellophane or other packing filler to make sure the cookie bundles don’t slide around in the box. I added a gift wrapped pair of handmade mittens to the box, as well. Tape up the box and you’re ready to get a shipping label and mail your cookies.
After packing up all the cookies and treats in the box, I taped it shut and wrote FRAGILE in large capital letters with a big red marker on two sides of the box.
After shipping these cookies over 2000 miles from Virginia to Colorado, I expected to loose a few cookies to breakage along the way. Trucks and airplanes are bouncy, so I thought at least a few would be lost. Lucky for me, all of the cookies this year arrived in good shape. I know using the aluminum foil as a protective cushion for shipping the cookies really helped. But, I think a major part of the success of this gift project was because I was lucky with my postal carrier for USPS. The boxes had been treated very carefully. I hope your postal worker is as kind and careful as ours.
Did you try it? Let me know how your luck was with shipping cookie gifts. What kind of cookies did you send in your gift or care package? Did they get there in good shape? Let me know in the comments below.
More Holiday Craft Ideas
Love DIY Christmas and holiday projects? Find more handmade holiday craft ideas at my Holiday Pattern Roundup Post.
It turns out that Santa doesn’t always remember to put tags on the presents he brings. I needed some gift tags for my presents this year, so I made up this sheet of printable “from Santa” gift tags for Christmas. If you need some gift tags for your little one’s presents, you are welcome to use mine. Below is a link to my Word document file of printable “from Santa” gift tags. Download it, add your child’s name, print, and cut out for a quick and free DIY project.
Type “Name” in the “Find what” field. Type your child’s name in the “Replace with” field.
Click “Replace all.”
Print your From Santa Gift Tags
Print on the best quality setting your printer allows. Try printing on different kinds of paper to mix up the look. If you use basic white printer paper, try cutting out a slightly larger square of colored paper or gift wrap and place it behind the label. These labels look so festive and bright.
These labels are smaller and will print so that you can cut them into 1.25 inch squares. Try using a paper cutter or a square paper punch to help make sure the labels come out perfectly square. Attach the labels to your gifts with a small bit of tape, and you are all done!
More Holiday Craft Ideas
Love DIY Christmas and holiday projects? Find more handmade holiday craft ideas at my Holiday Pattern Roundup Post.
If you like these printable “From Santa” Gift Tags for Christmas, I’d love hear about it. Comment below or share your photos with Liz @PurlsAndPixels on Twitter, Instagram, or Facebook.
When my little one turned 2, he was completely obsessed with Disney Junior’s Mickey Mouse Club House. So, of course, I decided to throw him a Mickey themed birthday party. The most important part of the party was his mickey cake. Mickey Mouse has a birthday in one of the episodes, and his cake is a yellow and red Mickey head. I tried to mimic this cake, and here is how I did it.
How to Make Mickey’s Birthday Cake
Pans
First things first, you will need three round cake pans to make Mickey’s Birthday Cake. One should be 8 inches and two should be 4 inches. I used two sets of these pans for my cake:
This will be a two layer cake. The 8 inch pan will make Mickey’s face, and the 4 inch pans will be his ears.
Recipe
I used my all time favorite chocolate cake recipe for this cake. It comes from Hershey Kitchens and you can get the full recipe and see other people’s reviews of it here. I love this chocolate cake because it is extremely moist and fluffy. It has the consistency of a box mix cake, but the flavor of homemade. Love it!
If you already have a favorite cake recipe, use it. This Mickey cake is all about the cake’s shape, so as long as your recipe can be baked into round layer cake pans, you can use any flavor or recipe you desire.
You’ll need to make a double batch of cake. So, either double your cake recipe, or make the cake twice. I made the cake twice, since my mixer just won’t hold two batches worth of ingredients. And, since my oven isn’t enormous, I was worried all the cakes wouldn’t fit at the same time.
For the first set of cakes, divide your batter between one 8-inch cake pan and two 4-inch cake pans. Put a little more than half of the cake batter into the 8-inch pan, and divide the rest between the two 4-inch pans. Don’t overfill the pans or you’ll have spillage during baking.
Bake as directed in the cake recipe you are following.
While these three cakes are cooling on wire racks, repeat this process. So, make another batch of cake and divide it among an 8-inch pan and two 4 inch pans. Bake and cool these cakes as well.
Once your cakes are cool, you can stack them and decorate.
Decorating Mickey’s Birthday Cake
Stack the cakes
First, frost one of the 8-inch cakes with a filling or frosting of your choice. I used chocolate frosting, but this is where you can get creative with flavor.
Carefully stack the second 8-inch cake on top of the first.
Place two of the 4 inch cakes so they make Mickey’s ears. Frost them with your filling frosting, then stack the other 4 inch cakes on top. You should now have a two layer cake that looks like mickey.
Frost your cake
You’ll need two batches of vanilla frosting – or two cans if you use store bought like I did. Dye one can of the frosting with a generous amount of yellow food coloring. I used Lemon Yellow from the Wilton icing color set.
Frost the cake yellow, as smoothly as you can. Then pipe red along the top outside of the Mickey shape, then around the bottom of the cake.
All done! Hip Hip Hooray!
Did you try making a Mickey’s birthday cake for your little one? Let me know how it turned out. Comment below or share pictures with #PurlsAndPixels on Pinterest, Instagram, Facebook, or Twitter.
Do-It-Yourself Knitting Gift Set from Liz @ PurlsAndPixels
Do you have a friend who always says, “I wish I knew how to knit”? Well, it’s time to make their yarn dreams come true with a DIY Learn to Knit Gift Set! This thoughtful and budget-friendly gift idea is perfect for birthdays, holidays, or just as a “thinking of you” surprise. Expectant and new moms love this too; it’s a cozy and creative baby shower gift that won’t end up in the ‘never used’ pile. Trust me; this kit has everything they need to knit their stress away.
Let’s dive in! Here’s your shopping list (with handy Amazon links) and a sprinkle of crafty advice.
Let’s start simple! My top choice for beginner projects is Lily Sugar ‘n Cream 100% Cotton Yarn. It’s sturdy, easy to work with, and perfect for learning basic stitches while making something useful like a washcloth. Plus, it’s 100% cotton, making it an eco-friendly option for those who prefer natural fibers. Grab one or two balls of washcloth yarn in their favorite colors so they can start off on the right foot.
Once your new knitter masters the basics, they will quickly want to level up to something more suitable for scarves and hats. Be sure to include two balls of a scarf yarn as well. My go-to is Caron Simply Soft Yarn. This yarn is fluffy, squishy, and machine washable: everything a newbie needs for creating their first cozy scarf. Feeling eco-conscious? Opt for Patons Classic Wool Worsted instead (it’s biodegradable, while acrylic yarn isn’t).
No matter what brand you choose, just make sure it’s labeled “worsted weight.” This yarn thickness is beginner-friendly and will allow them to make a variety of projects. Pick one or two colors you know your recipient will love—there’s no need to overcomplicate things!
🪡 Knitting Needles
If your giftee gets confused by all the needle options (spoiler: they will), save the day with these two staples:
Circular needles don’t look like your grandma’s chopsticks: they’re even better. These versatile tools can knit almost anything, and they’re easy on the hands. Your new knitter will need both sizes to get off to a great start. Save the day, by giving them the perfect tools.
✂️ Sharp Scissors or Yarn Cutting Pendant
Yes, everyone has scissors. But sharp sewing scissors are a game-changer. They’re perfect for snipping yarn without fraying or splitting the fibers.
If this kit is for a little one or if you want a safer option, consider adding a yarn cutting pendant instead. It’s stylish, safer, and just plain cool. Check out this pendant that cuts yarn cleanly without the risk of sharp blades—ideal for on-the-go knitting projects!
🪡 Tapestry Needles
These big-eyed needles are what your new knitter will need to weave in yarn ends, essentially tidying up their masterpiece. A pack of six tapestry needles will do the trick. Bonus tip: If you’re making multiple gift sets, split the package up. Sharing is caring (and cost-effective).
Pair it with a Knitting Journal, where they can jot down notes, track projects, and doodle their creative ideas. Together, these knitting books make a killer combo for anyone just starting out.
🖊️ Gift Card with Link to Free Video Tutorials
Include a cute gift card with a link to my Free Learn to Knit Tutorials. You can print the card on pretty paper (bonus points for brown cardstock – it’s got that rustic chic vibe) and write a personal message. With this guide, they’ll be casting on and purling in no time. It’s like giving them a one-way ticket to the wonderful world of knitting.
🎁 Gift Wrap: Storage Box Edition
Time to wrap it up! Skip the flimsy gift bags and go for a decorative photo storage box or a sturdy tote. Not only do these make for pretty packaging, but they’re also practical for storing yarn, needles, and other knitting treasures. I’ve linked a few of my favorites on Amazon, but you can also find cute options at your local craft store.
Top it all off with a fancy gift bow, and voilà! Your DIY Learn to Knit Gift Set is ready to impress. 🥳
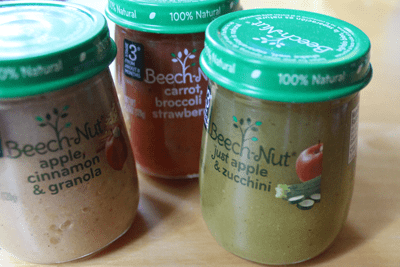
The new baby food jars from Beechnut are my absolute favorite. The canning jars Beechnut chose are a unique pear shape that flares at the bottom. They were so adorable I could not resist collecting them and saving them up for some kind of craft project that I’d get to “one of these days.”
When I finally got around to making this baby food jar stash into a craft project, I ran into a problem. The clear plastic labels do peel off easily. Unfortunately, the glue used to adhere the label to the jar leaves behind a terrible sticky residue. I could not get the sticky residue off the baby food jars just by tossing the jars in the dishwasher, as I had hoped. And to just leave the glue on the jars on was not a good solution; it is incredibly sticky, so it collects dirt and hair like an icky magnet. Icky, sticky containers aren’t pretty or useful, so I was determined to find a way to be rid of the glue on all my little jars.
Solution: How to Remove Labels from Beechnut Baby Food Jars
I tried all sorts of ways to figure out how to remove labels from Beechnut baby food jars. And, after a few experiments, I think I have found the best solution! It is easy, normally around the house and chemical free. What is this miracle solution? Plain old vegetable oil.
It does still take a bit of elbow grease to get the gooey label residue off, but here’s what I did. And there are no harsh chemicals involved, so I didn’t have to worry about doing my project around the kiddo.
I grabbed an old toothbrush, and a bottle of vegetable oil and got to scrubbing. Dip the toothbrush in the oil, scrub the residue loose, wipe with a paper towel or dry cloth, and voila, no more residue!
Run the oily jars thru the dishwasher to get rid of the remaining vegetable oil, and you are ready to craft.
What to Make with Beechnut Baby Food Jars
I needed a new storage system for my beads, since I make jewelry. I re-purposed the baby food jars to store my gems and stones. To make them a little prettier, I got a bottle of teal spray paint (Rustoleum). A couple thin coats made the lids fresh and new, and I think this baby food jar craft project looks adorable siting on my shelf.
You could make lots of cute things from the uniquely shaped Beechnut jars, just be creative and use them to fill a need you have.
So, I held my very first yard sale today! Well, actually it was a garage sale, since it was inside the garage. Whatever you call it, selling your stuff can sometimes be necessary. Whether you’re trying to clean out old clutter from around the house or working to get a little extra cash, a yard sale or garage sale is a great way to go.
For my yard sale, I had quite a lot of adult and baby clothing. Rather than tagging each outfit individually (since we had a lot), I made up some signs to help with the sale. I put all the baby clothes in bins by size and put the corresponding sign on the bin. For the adult clothes, I made a generic sign, which says all clothes are $2 unless otherwise marked. We also had a credit card reader so that I could take payments through Amazon, so I made up a couple of signs saying so as well. I’m sharing a free downloadable copy of my yard sale signs so that you can print your own signs for your garage sale. These are in Word format so you can edit the details yourself.
Click the links below do download the word documents. Good luck with your yard sale!
Looking for a quick and festive garland for your Christmas tree or holiday decor? This DIY Peppermint Twist Crochet Garland is a super easy, beginner-friendly project that works up fast and adds a handmade touch to your holiday decorations. Perfect for crocheters of all levels, even kids learning to chain!
Why Make a Crochet Peppermint Garland?
When I set up my new Christmas tree, I realized I forgot to buy a garland. Rather than leave the tree looking plain, I grabbed some yarn and crocheted a peppermint-inspired garland. In about an hour, I had a cheerful, festive garland—and now you can make one too!
Making a Peppermint Twist Garland Couldn’t Be Easier
This simple, fast project is a fantastic way for beginning crocheters and kids to learn to chain in crochet. You’ll hold red and white yarn together, pretending they are one strand of yarn. Then, just make a crochet chain until the garland is long enough and you’ve got a new handmade decoration to treasure for generations to come.
Do it yourself and add a handmade touch to your Christmas tree this holiday. Or, make it a family project and teach your children how to chain and let them practice with this fun and cheerful crochet garland. You all can even take turns! Everyone will be proud to see their own handmade work shown off for the holidays.
The easy chain crochet project ends up looking like a long string of peppermint that you can twist around your Christmas tree. Or drape it along your mantle, up the stairs, or on any other surface that needs a little holiday cheer!
Combine the yarn: Hold the red and white yarn together as if they were one strand.
Start with a slip knot: Create a slip knot and place it on your hook.
Chain away: Using the combined yarn, chain until your white yarn runs out (you may have extra red) or until you reach your desired length.
Finish off: Cut the red yarn and pull both strands through the final stitch to secure.
Trim the ends (optional): Leave the ends loose for a rustic look or trim them for a polished finish.
That’s it! Your crochet peppermint garland is ready to display. Easy as pie!
Creative Ways to Use Your Crochet Garland
Now drape your peppermint twist crochet garland around the Christmas tree, down the banister, or weave it into a pine wreath. What a fun handmade Christmas project. Now don’t you feel crafty?


 When I finally got around to making this baby food jar stash into a craft project, I ran into a problem. The clear plastic labels do peel off easily. Unfortunately, the glue used to adhere the label to the jar leaves behind a terrible sticky residue. I could not get the sticky residue off the baby food jars just by tossing the jars in the dishwasher, as I had hoped. And to just leave the glue on the jars on was not a good solution; it is incredibly sticky, so it collects dirt and hair like an icky magnet. Icky, sticky containers aren’t pretty or useful, so I was determined to find a way to be rid of the glue on all my little jars.
 stones. To make them a little prettier, I got a bottle of teal spray paint (Rustoleum). A couple thin coats made the lids fresh and new, and I think this baby food jar craft project looks adorable siting on my shelf.


 a generic sign, which says all clothes are $2 unless otherwise marked. We also had a credit card reader so that I could take payments through Amazon, so I made up a couple of signs saying so as well. I’m sharing a free downloadable copy of my yard sale signs so that you can print your own signs for your garage sale. These are in Word format so you can edit the details yourself.


