Using Scrap Yarn Instead of Stitch Holders

How to use scrap yarn instead of a stitch holder - a knitting lesson from Liz Chandler @PurlsAndPixels.

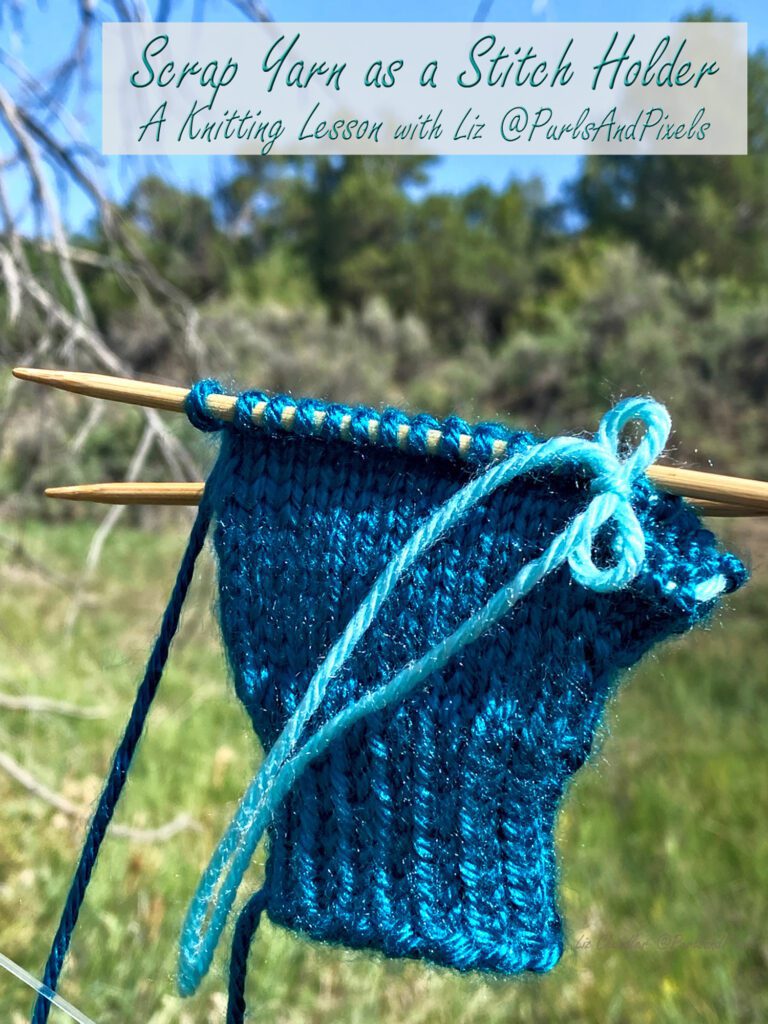
If you need to use a stitch holder, but do not have one available, you can substitute a strand of scrap yarn. Using a darning needle, thread a bit of yarn through live stitches that need to be kept workable for later. Tie a small knot in the scrap yarn to keep it in place and it will hold your stitches until you are ready to knit them again.

Below you will find both video and written guides to help you learn how to substitute yarn for a stitch holder. Or, learn to use a stitch holder at this link.

Video Guide: How to Use Scrap Yarn Instead of Stitch Holders

Written Guides: How to Use Scrap Yarn Instead of Stitch Holders

Step 1: Using scrap yarn as a stitch holder - a knitting lesson from Liz Chandler @PurlsAndPixels.

Scrap Yarn as Stitch Holder, Step 1:

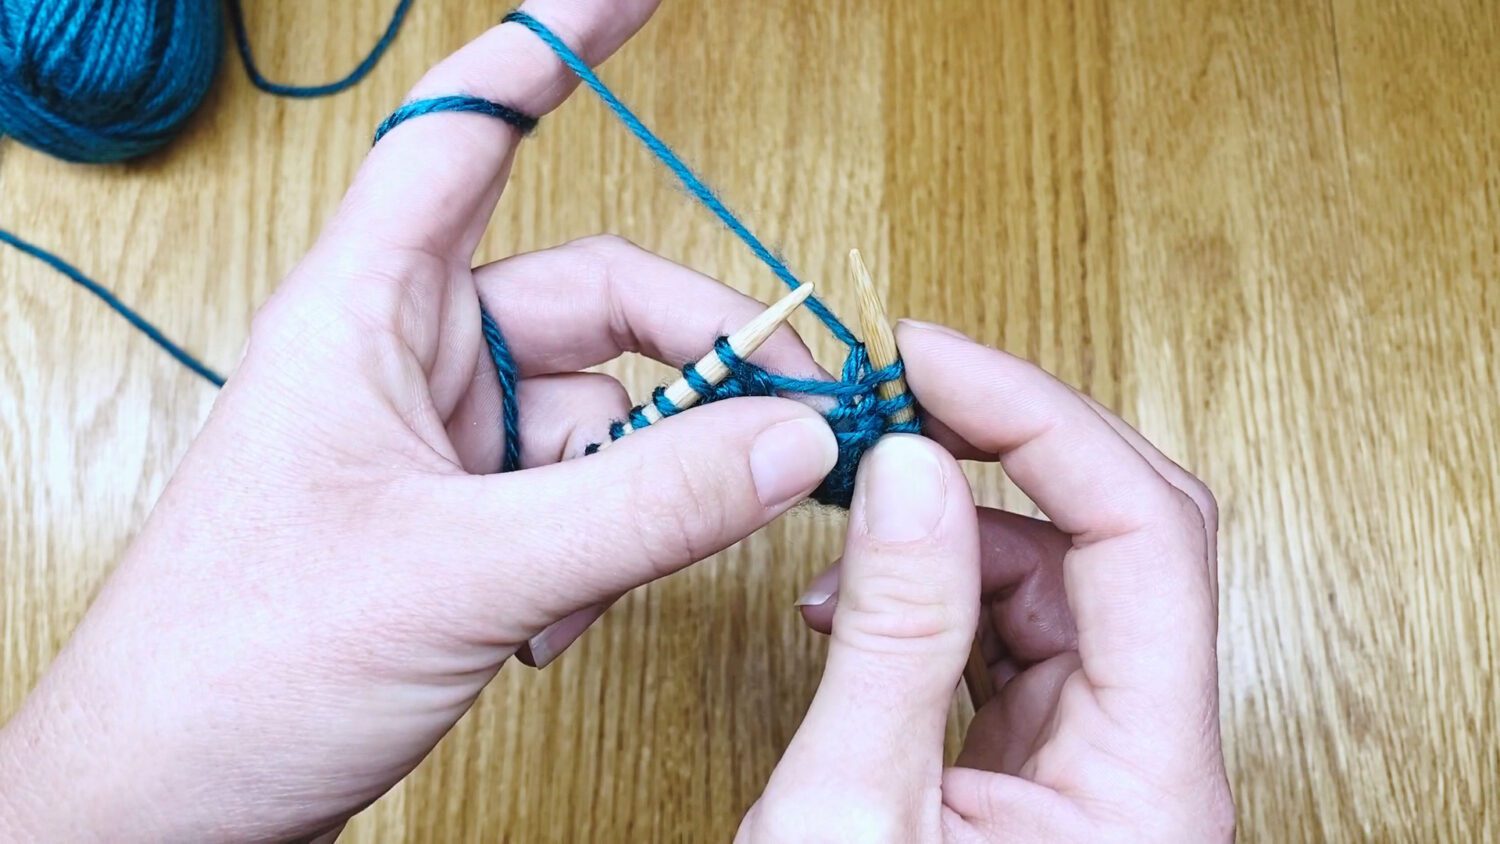
Thread a scrap of yarn that is at least 12 inches long onto a darning needle. Place the working yarn behind the knitting needles. Let go of the righthand needle and pick up the darning needle with your right hand.

Step 2: Using scrap yarn as a stitch holder - a knitting lesson from Liz Chandler @PurlsAndPixels.

Scrap Yarn as Stitch Holder, Step 2:

Insert the tip of the darning needle into the front leg of the next live stitch from back to front (as if to purl).

Step 3: Using scrap yarn as a stitch holder - a knitting lesson from Liz Chandler @PurlsAndPixels.

Scrap Yarn as Stitch Holder, Step 3:

Slip the stitch onto the tip of the darning needle.

Step 4: Using scrap yarn as a stitch holder - a knitting lesson from Liz Chandler @PurlsAndPixels.

Scrap Yarn as Stitch Holder, Step 4:

Slip all the stitches your pattern instructs onto the darning needle and scrap yarn in the same manner.

Step 5: Using scrap yarn as a stitch holder - a knitting lesson from Liz Chandler @PurlsAndPixels.

Scrap Yarn as Stitch Holder, Step 5:

Pull the darning needle and scrap yarn through the stitches, so the stitches sit on the yarn. Ensure you do not allow the stitches to drop off the scrap of yarn.  

Step 6: Using scrap yarn as a stitch holder - a knitting lesson from Liz Chandler @PurlsAndPixels.

Scrap Yarn as Stitch Holder, Step 6:

Carefully remove the scrap yarn from the darning needle.

Step 7: Using scrap yarn as a stitch holder - a knitting lesson from Liz Chandler @PurlsAndPixels.

Scrap Yarn as Stitch Holder, Step 7:

Tie a knot or bow in with the ends of the scrap yarn, which can be undone later. 

Step 8: Using scrap yarn as a stitch holder - a knitting lesson from Liz Chandler @PurlsAndPixels.

Scrap Yarn as Stitch Holder, Step 8:

Pick up the working yarn and knit into the next live stitch.

Using scrap yarn as a stitch holder - a knitting lesson from Liz Chandler @PurlsAndPixels.

Practice With My Knitting Patterns

Ready to try it?

Simple fingerless glove knitting pattern in all sizes by Liz Chandler @PurlsAnd Pixels.

Try knitting Simple Fingerless Gloves to practice using stitch holders to make thumbs.

Basic mitten knitting pattern by Liz Chandler @PurlsAndPixels.

In my pattern for Basic Knit Mittens you will also separate the thumb and hand sections with a stitch holder.

How to use scrap yarn instead of a stitch holder - a knitting lesson from Liz Chandler @PurlsAndPixels.

Up Next

Learn to bind off when you have been knitting in the magic loop - a knitting lesson with Liz Chandler @PurlsAndPixels.

To finish off fingerless gloves and other round knits, you’ll need to learn how to bind off. In the next lesson we will learn how to bind off when working in the Magic Loop.

Go Back to the Learn to Knit Index

Increases

Learn to knit make one increases in this lesson with Liz Chandler @PurlsAndPixels.
Learn how to use "make one increases" to make a glove thumb gusset in this knitting lesson with Liz Chandler @PurlsAndPixels.

Increases add live stitches to your knitted rows. This is useful in shaping knitwear. Gloves and mittens, for example, use increases to shape around the base of the thumb. Adding increases along one edge of a knit tube creates a set of stitches that make room for the thumb; this is commonly referred to as a “gusset.”

The “make one” increases are often used to add stitches to rows. You can create a new live stitch by picking up the strand of yarn between two stitches and working into it. This will expand your work and make it wider.

When increasing with a “make one” your new stitch will lean either to the left or to the right, depending on how you add the stitch. The “make one left (M1L)” increase leans toward the left. The “make one right (M1R)” increase leans toward the right. If your pattern does not specify left or right, and only uses the abbreviation M1, it is usually best to assume the author means “make one left” or “M1L.”

Below you will find both video and written guides to help you learn how to knit make one increases.

Video Guide: How to Knit Increases

Written Guides: How to Knit Increases

Learn to knit make one left (M1L) increases in this lesson with Liz Chandler @PurlsAndPixels.

Make One Left (M1L):

Click here to be directed to the step-by-step written guide to the “make one left” (M1L) increase.

Learn to knit make one right (M1R) increases in this lesson with Liz Chandler @PurlsAndPixels.

Make One Right (M1R):

Click here to be directed to the step-by-step written guide to the “make one right” (M1R) increase.

Practice With My Knitting Patterns

Ready to try it?

Simple fingerless glove knitting pattern in all sizes by Liz Chandler @PurlsAnd Pixels.

Try knitting Simple Fingerless Gloves, which use increases to shape the thumb opening.

Basic mitten knitting pattern by Liz Chandler @PurlsAndPixels.

In my pattern for Basic Knit Mittens you will also use increases to make the thumb gussets.

Learn to knit make one increases in this lesson with Liz Chandler @PurlsAndPixels.

Up Next

Learn to slip stitches onto a stitch holder to work later in this lesson with Liz @PurlsAndPixels.

Once you have shaped the thumb opening of a glove or mitten, you will usually be instructed to slip the thumb stitches onto a stitch holder. In the next lesson I will show you how.

Go Back to the Learn to Knit Index

Make One Left (M1L)

Learn the make one left (M1L) increase - a knitting lesson with Liz Chandler @PurlsAndPixels.

As its name suggests, the “make one left” increase is a left-leaning stitch. Use this increase to add live stitches to a work that is already in progress. This will lengthen your knitted rows and enable you to shape your knitwear.

Note: When knitting a pattern that states “make one” it is usually safe to assume the pattern means make one left.

Below you will find both video and written guides to help you learn how to knit increases.

Video Guide: How to Knit Make One Left (M1L) Increases

Written Guides: How to Knit Make One Left (M1L) Increases

Step 1: Make one left increases (M1L or M1) - a knitting lesson with Liz Chandler @PurlsAndPixels.

M1L, Step 1:

Locate the strand of yarn that is between two live stitches and just below your needles.

Step 2: Make one left increases (M1L or M1) - a knitting lesson with Liz Chandler @PurlsAndPixels.

M1L, Step 2:

Insert the tip of your left needle under the strand between the live stitches from front to back.

Step 3: Make one left increases (M1L or M1) - a knitting lesson with Liz Chandler @PurlsAndPixels.

M1L, Step 3:

You will now have a new live stitch on your left needle tip.

Step 4: Make one left increases (M1L or M1) - a knitting lesson with Liz Chandler @PurlsAndPixels.

M1L, Step 4:

Insert the right needle tip into the back leg of the new live stitch.

Step 5: Make one left increases (M1L or M1) - a knitting lesson with Liz Chandler @PurlsAndPixels.

M1L, Step 5:

With the right needle tip, grab the working yarn and draw it through the stitch.

Step 6: Make one left increases (M1L or M1) - a knitting lesson with Liz Chandler @PurlsAndPixels.

M1L, Step 6:

Slide the stitch you have just worked into off your left needle, allowing the new stitch to remain on your right needle.

Make one left increases (M1L or M1) - a knitting lesson with Liz Chandler @PurlsAndPixels.
Learn to knit increases.

Return to the Knitting Increases Page to learn more increases.

Practice With My Knitting Patterns

Ready to try it?

Simple fingerless glove knitting pattern in all sizes by Liz Chandler @PurlsAnd Pixels.

Try knitting Simple Fingerless Gloves, which use increases to shape the thumb opening.

Basic mitten knitting pattern by Liz Chandler @PurlsAndPixels.

In my pattern for Basic Knit Mittens you will also use increases to make the thumb gussets.

Up Next

Learn to slip stitches onto a stitch holder to work later in this lesson with Liz @PurlsAndPixels.

Once you have shaped the thumb opening of a glove or mitten, you will usually be instructed to slip the thumb stitches onto a stitch holder. In the next lesson I will show you how.

Go Back to the Learn to Knit Index

Make One Right (M1R)

Learn the make one right (M1R) increase - a knitting lesson with Liz Chandler @PurlsAndPixels.

The “make one right” increase allows you to add stitches to knitted rows that are in progress. These increases will lean toward the right, so your work will grow in a rightward direction. This increase is especially helpful in knitting sweaters because it allows you to create larger spaces for arms and shoulders.

Below you will find both video and written guides to help you learn how to knit M1R increases.

Video Guide: How to Knit Make One Right (M1R) Increases

Written Guides: How to Knit Make One Right (M1R) Increases

Step 1: Make one right increases (M1R) - a knitting lesson with Liz Chandler @PurlsAndPixels.

M1R, Step 1:

Locate the strand of yarn that is between two live stitches and just below your needles.

Step 2: Make one right increases (M1R) - a knitting lesson with Liz Chandler @PurlsAndPixels.

M1R, Step 2:

Insert the tip of your left needle under the strand between the live stitches from back to front.

Step 3: Make one right increases (M1R) - a knitting lesson with Liz Chandler @PurlsAndPixels.

M1R, Step 3:

You will now have a new live stitch on your left needle tip.

Step 4: Make one right increases (M1R) - a knitting lesson with Liz Chandler @PurlsAndPixels.

M1R, Step 4:

Insert the right needle tip into the front leg of the new live stitch.

Step 5: Make one right increases (M1R) - a knitting lesson with Liz Chandler @PurlsAndPixels.

M1R, Step 5:

With the right needle tip, grab the working yarn and draw it through the stitch.

Step 6: Make one right increases (M1R) - a knitting lesson with Liz Chandler @PurlsAndPixels.

M1R, Step 6:

Slide the stitch you have just worked into off your left needle, allowing the new stitch to remain on your right needle.

Make one right increases (M1R) - a knitting lesson with Liz Chandler @PurlsAndPixels.
Learn to knit increases.

Return to the Knitting Increases Page to learn more increases.

Learn to knit make one increases in this lesson with Liz Chandler @PurlsAndPixels.

Up Next

Learn to slip stitches onto a stitch holder to work later in this lesson with Liz @PurlsAndPixels.

Once you have shaped the thumb opening of a glove or mitten, you will usually be instructed to slip the thumb stitches onto a stitch holder. In the next lesson I will show you how.

Go Back to the Learn to Knit Index

Weave in the Cast-on Tail in the Round

Learn to weave in the cast on tail to hide the jog at the beginning of knit rounds - a knitting lesson with Liz Chandler @PurlsAndPixels.
Use the yarn tail to smooth the jog at the beginning of hats that have been knit in the round - a knitting lesson with Liz Chandler @PurlsAndPixels.

At the beginning of your knit rounds, there will likely be a small jog near your slipknot. When you weave in the cast on tail on a round knit project, you can fix the jog and hide the slipknot. Use a darning needle to sew the loose end into the project, while doing your best to match the pattern you’ve knit. Then, tie in your loose ends to hide your ends and anchor your yarn in place.

Below you will find both video and written guides to help you learn how to finish the bottom edge of knit hats.

Video Guide: How to Weave in the Cast-on Tail for Knits Made in the Round

Written Guides: How to Weave in the Cast-on Tail for Knits Made in the Round

Step 1: Weave in cast on tail for round knitting projects - a lesson with Liz Chandler @PurlsAndPixels.

Weave in Cast on Tail to Finish Round, Step 1:

Thread the loose end through the eye of a darning needle.

Step 2: Weave in cast on tail for round knitting projects - a lesson with Liz Chandler @PurlsAndPixels.

Weave in Cast on Tail to Finish Round, Step 2:

Turn the work so that the cast-on edge of the work is facing you and the top of the project is facing down. Near the jog on this edge, locate the slipknot, which was your first cast-on stitch.

Step 3: Weave in cast on tail for round knitting projects - a lesson with Liz Chandler @PurlsAndPixels.

Weave in Cast on Tail to Finish Round, Step 3:

Insert the tip of the darning needle down through the stitch directly behind the slipknot.

Step 4: Weave in cast on tail for round knitting projects - a lesson with Liz Chandler @PurlsAndPixels.

Weave in Cast on Tail to Finish Round, Step 4:

Pull the needle and the yarn tail through the stitch.

Step 5: Weave in cast on tail for round knitting projects - a lesson with Liz Chandler @PurlsAndPixels.

Weave in Cast on Tail to Finish Round, Step 5:

Insert the tip of the darning needle down and through the slipknot.

Step 6: Weave in cast on tail for round knitting projects - a lesson with Liz Chandler @PurlsAndPixels.

Weave in Cast on Tail to Finish Round, Step 6:

Pull the needle and the yarn tail through the slipknot.

Step 7: Weave in cast on tail for round knitting projects - a lesson with Liz Chandler @PurlsAndPixels.

Weave in Cast on Tail to Finish Round, Step 7:

Guide the tip of the darning needle under the edge of the work and toward the front of the work.

Step 8: Weave in cast on tail for round knitting projects - a lesson with Liz Chandler @PurlsAndPixels.

Weave in Cast on Tail to Finish Round, Step 8:

Pull the needle and the yarn tail through to the outside of your work.

Step 9: Weave in cast on tail for round knitting projects - a lesson with Liz Chandler @PurlsAndPixels.

Weave in Cast on Tail to Finish Round, Step 9:

Locate the loop just behind your slipknot on the backside of your work and insert your darning needle tip down and through it.

Step 10: Weave in cast on tail for round knitting projects - a lesson with Liz Chandler @PurlsAndPixels.

Weave in Cast on Tail to Finish Round, Step 10:

Pull the needle and the yarn tail through the stitch. 

Step 11: Weave in cast on tail for round knitting projects - a lesson with Liz Chandler @PurlsAndPixels.

Weave in Cast on Tail to Finish Round, Step 11:

Take the darning needle off the yarn tail.

Step 12: Weave in cast on tail for round knitting projects - a lesson with Liz Chandler @PurlsAndPixels.

Weave in Cast on Tail to Finish Round, Step 12:

Inspect your yarn tail by untwisting it a bit, near your work. Identify the individual yarn plies and count them. Use the tip of your darning needle to help you split the plies into two equal sections. With the four-ply yarn shown, the plies should be split so there are two on each side.

Step 13: Weave in cast on tail for round knitting projects - a lesson with Liz Chandler @PurlsAndPixels.

Weave in Cast on Tail to Finish Round, Step 13:

Gently separate the two halves of the yarn with your darning needle by sliding it out toward the end of the tail. Take care not to break the strands by pulling too quickly or roughly.

Step 14: Weave in cast on tail for round knitting projects - a lesson with Liz Chandler @PurlsAndPixels.

Weave in Cast on Tail to Finish Round, Step 14:

Once the tail is split in two, set one half aside and thread the other half through the eye of your darning needle.

Step 15: Weave in cast on tail for round knitting projects - a lesson with Liz Chandler @PurlsAndPixels.

Weave in Cast on Tail to Finish Round, Step 15:

With the darning needle, sew this half of the tail around the knit stitch that it is coming out from under. Do this by bringing your needle tip under and through the other side of the knit stitch.

Step 16: Weave in cast on tail for round knitting projects - a lesson with Liz Chandler @PurlsAndPixels.

Weave in Cast on Tail to Finish Round, Step 16:

Pull the tail through, only tightly enough to match the pattern of your knitting. Do not pull too tightly.

Step 17: Weave in cast on tail for round knitting projects - a lesson with Liz Chandler @PurlsAndPixels.

Weave in Cast on Tail to Finish Round, Step 17:

Remove the tail from the darning needle.

Step 18: Weave in cast on tail for round knitting projects - a lesson with Liz Chandler @PurlsAndPixels.

Weave in Cast on Tail to Finish Round, Step 18:

Lay the halves of the yarn tail out in opposite directions. One side should point right, the other should point left.

Step 19: Weave in cast on tail for round knitting projects - a lesson with Liz Chandler @PurlsAndPixels.

Weave in Cast on Tail to Finish Round, Step 19:

Tie two small interlocking knots. (See this link for more specific instructions.)  

Step 20: Weave in cast on tail for round knitting projects - a lesson with Liz Chandler @PurlsAndPixels.

Weave in Cast on Tail to Finish Round, Step 20:

Using the sharpest scissors you have available, clip off both halves of the yarn tail, one at a time, as closely as possible to the knot, without cutting the knot itself.

How to finish hats that have been knit from the bottom up.

Return to Hat Finishing Tips to see how to to weave in your other loose ends.

Practice With My Knitting Patterns

Ready to try it?

Learn to make a simple knit beanie hat in all sizes with this knitting pattern by Liz Chandler @PurlsAndPixels.

You will finish Simple Knit Beanie hats with the yarn tails as I’ve shown you in this lesson.

Basic Slouch Hat knitting pattern by Liz Chandler @PurlsAndPixels.

My Slouch Hat pattern is finished by weaving in the loose ends in the same manner.

Learn to weave in the cast on tail to hide the jog at the beginning of knit rounds - a knitting lesson with Liz Chandler @PurlsAndPixels.

Up Next

Next, let’s learn to make knitting increases. The “Make One” increases add stitches to your rows. Learning these stitches will allow you to shape the thumbs of gloves and more.

Go Back to the Learn to Knit Index

Weave in the Loose End on Hat Tops

Learn how to weave in the loose end at the top of a hat in this knitting lesson with Liz Chandler @PurlsAndPixels.

Once you have taken your last stitches off the knitting needles, you can weave in your loose end to finish the tops of your knit hat projects. First, you will pull the loose end to the inside of your work. Then weave then end into a few stitches before tying a knot to anchor the yarn in place.

Below you will find both video and written guides to help you learn how weave in the yarn tail at the top of a knit hat.

Video Guide: How to Weave in the Yarn Tail at the Top of a Knit Hat

Written Guides: How to Weave in the Yarn Tail at the Top of a Knit Hat

Step 1: Weave in the loose end of hat tops in this knitting lesson with Liz Chandler @PurlsAndPixels.

Weave in Hat Top Tail, Step 1:

Thread the loose end through the eye of a darning needle.

Step 2: Weave in the loose end of hat tops in this knitting lesson with Liz Chandler @PurlsAndPixels.

Weave in Hat Top Tail, Step 2:

Insert the tip of the darning needle into the middle of the hole at the top of your work.

Step 3: Weave in the loose end of hat tops in this knitting lesson with Liz Chandler @PurlsAndPixels.

Weave in Hat Top Tail, Step 3:

While turning your work inside-out, pull the darning needle and yarn tail through to the back of the work.

Step 4: Weave in the loose end of hat tops in this knitting lesson with Liz Chandler @PurlsAndPixels.

Weave in Hat Top Tail, Step 4:

Locate the stitches that form a ring around the hole at the top of your work. Thread the tip of the darning needle through three or four stitches in a counterclockwise direction.

Step 5: Weave in the loose end of hat tops in this knitting lesson with Liz Chandler @PurlsAndPixels.

Weave in Hat Top Tail, Step 5:

Pull the needle and the yarn tail through the stitches.

Step 6: Weave in the loose end of hat tops in this knitting lesson with Liz Chandler @PurlsAndPixels.

Weave in Hat Top Tail, Step 6:

Take the darning needle off the yarn tail.

Step 7: Weave in the loose end of hat tops in this knitting lesson with Liz Chandler @PurlsAndPixels.

Weave in Hat Top Tail, Step 7:

Inspect your yarn tail by untwisting it a bit, near your work. Identify the individual yarn plies and count them. Use the tip of your darning needle to help you split the plies into two equal sections. With the four-ply yarn shown, the plies should be split so there are two on each side.

Step 8: Weave in the loose end of hat tops in this knitting lesson with Liz Chandler @PurlsAndPixels.

Weave in Hat Top Tail, Step 8:

Gently separate the two halves of the yarn with your darning needle by sliding it out toward the end of the tail. Take care not to break the strands by pulling too quickly or roughly.

Step 9: Weave in the loose end of hat tops in this knitting lesson with Liz Chandler @PurlsAndPixels.

Weave in Hat Top Tail, Step 9:

Once the tail is split in two, set one half aside and thread the other half through the eye of your darning needle.

Step 10: Weave in the loose end of hat tops in this knitting lesson with Liz Chandler @PurlsAndPixels.

Weave in Hat Top Tail, Step 10:

With the darning needle, sew this half of the tail under and through several of the stitches that form a circle at the top of the work, continuing in a counterclockwise direction.

Step 11: Weave in the loose end of hat tops in this knitting lesson with Liz Chandler @PurlsAndPixels.

Weave in Hat Top Tail, Step 11:

Pull the yarn through the stitches with the darning needle, then continue sewing it through all the stitches in a counterclockwise direction until you reach the other half of the yarn tail.

Step 12: Weave in the loose end of hat tops in this knitting lesson with Liz Chandler @PurlsAndPixels.

Weave in Hat Top Tail, Step 12:

Remove the tail from the darning needle. Your end is now prepared so that when you tie your knot, you will be anchoring it inside the top ring of stitches.

Step 13: Weave in the loose end of hat tops in this knitting lesson with Liz Chandler @PurlsAndPixels.

Weave in Hat Top Tail, Step 13:

Lay the halves of the yarn tail out in opposite directions. One side should point right, the other should point left.

Step 14: Weave in the loose end of hat tops in this knitting lesson with Liz Chandler @PurlsAndPixels.

Weave in Hat Top Tail, Step 14:

Tie two small interlocking knots. (See this link for more specific instructions.)  

Step 15: Weave in the loose end of hat tops in this knitting lesson with Liz Chandler @PurlsAndPixels.

Weave in Hat Top Tail, Step 15:

Using the sharpest scissors you have available, clip off both halves of the yarn tail, one at a time, as closely as possible to the knot, without cutting the knot itself.

Step 16: Weave in the loose end of hat tops in this knitting lesson with Liz Chandler @PurlsAndPixels.

Weave in Hat Top Tail, Step 16:

Stretch the top of your work to help the knot settle into the project. It will hide itself amongst the other stitches.

Return to Hat Finishing Tips to see how to to weave in your other loose ends.

Practice With My Knitting Patterns

Ready to try it?

Learn to make a simple knit beanie hat in all sizes with this knitting pattern by Liz Chandler @PurlsAndPixels.

You will finish Simple Knit Beanie hats with the yarn tails as I’ve shown you in this lesson.

Basic Slouch Hat knitting pattern by Liz Chandler @PurlsAndPixels.

My Slouch Hat pattern is finished by weaving in the loose ends in the same manner.

Learn to close hat tops in this knitting lesson from Liz Chandler @PurlsAnd Pixels.

Up Next

Next, let’s learn to make knitting increases. The “Make One” increases add stitches to your rows. Learning these stitches will allow you to shape the thumbs of gloves and more.

Go Back to the Learn to Knit Index

Draw Yarn Through Remaining Stitches

Learn to bind off hats that are knit in the round by drawing the yarn tail through the remaining stitches - a knitting lesson with Liz Chandler @PurlsAndPixels.
Learn to close hat tops in this knitting lesson from Liz Chandler @PurlsAnd Pixels.

When a pattern instructs you to “draw yarn through the remaining stitches,” it is asking you to weave the yarn tail through your final live stitches. This will remove your stitches from the needles and will also keeping them from running. Using a darning needle (or blunt tapestry needle) to slip the stitches onto the yarn tail makes this bind off easier to complete. Once you have threaded the live stitches onto the yarn tail, pulling on the end brings the stitches together and closes the hole at the top of your work.

Below you will find both video and written guides to help you learn how to draw yarn through your remaining live stitches.

Video Guide: How to Draw Yarn Through Remaining Stitches

Written Guides: How to Draw Yarn Through Remaining Stitches

Step 1: Draw yarn through remaining stitches to bind off knits in the round - a lesson with Liz Chandler @PurlsAndPixels.

Draw Tail Thru Remaining Stitches, Step 1:

Measure the working yarn coming from your knitting and find a point that is roughly eight to ten inches away from your needles (or the length your pattern instructs). With sharp scissors, cut the working yarn at that point.

Step 2: Draw yarn through remaining stitches to bind off knits in the round - a lesson with Liz Chandler @PurlsAndPixels.

Draw Tail Thru Remaining Stitches, Step 2:

Thread the loose end through the eye of a darning needle.

Step 3: Draw yarn through remaining stitches to bind off knits in the round - a lesson with Liz Chandler @PurlsAndPixels.

Draw Tail Thru Remaining Stitches, Step 3:

Locate the next live stitch that would have been worked if you had continued knitting your pattern. Starting with this first live stitch, insert the tip of the darning needle into the front leg of the stitch from front to back.

Step 4: Draw yarn through remaining stitches to bind off knits in the round - a lesson with Liz Chandler @PurlsAndPixels.

Draw Tail Thru Remaining Stitches, Step 4:

Slip the stitch onto the darning needle (slip the stitch purlwise).

Step 5: Draw yarn through remaining stitches to bind off knits in the round - a lesson with Liz Chandler @PurlsAndPixels.

Draw Tail Thru Remaining Stitches, Step 5:

Continue slipping live stitches onto your darning needle until it fills up. Then, carefully pull the darning needle and yarn tail through the stitches.

Step 6: Draw yarn through remaining stitches to bind off knits in the round - a lesson with Liz Chandler @PurlsAndPixels.

Draw Tail Thru Remaining Stitches, Step 6:

In the same manner, slip all the remaining stitches onto the darning needle. 

Step 7: Draw yarn through remaining stitches to bind off knits in the round - a lesson with Liz Chandler @PurlsAndPixels.

Draw Tail Thru Remaining Stitches, Step 7:

Thread the remaining stitches onto the yarn by pulling the darning needle through them.

Draw Tail Thru Remaining Stitches, Step 8:

Pull the yarn tail away from your work to secure the stitches; this will bring the stitches closer together and close the hole at the top of your work.

How to finish hats that have been knit from the bottom up.

Return to Hat Finishing Tips to see how to to weave in your loose ends.

Practice With My Knitting Patterns

Ready to try it?

Learn to make a simple knit beanie hat in all sizes with this knitting pattern by Liz Chandler @PurlsAndPixels.

You will finish Simple Knit Beanie hats with the yarn tails as I’ve shown you in this lesson.

Basic Slouch Hat knitting pattern by Liz Chandler @PurlsAndPixels.

My Slouch Hat pattern is finished by weaving in the loose ends in the same manner.

Learn to bind off hats that are knit in the round by drawing the yarn tail through the remaining stitches - a knitting lesson with Liz Chandler @PurlsAndPixels.

Up Next

Next, let’s learn to make knitting increases. The “Make One” increases add stitches to your rows. Learning these stitches will allow you to shape the thumbs of gloves and more.

Go Back to the Learn to Knit Index

Finishing Knit Hats

Learn to finish knit hats with loose ends in this knitting tutorial from Liz Chandler @PurlsAndPixels.

After knitting a hat in the round, you will want to take it off the needles, then weave in your loose ends. Instead of “bind off,” many knitting patterns worked in the round will use the instruction “draw yarn through the remaining stitches.” To do this, you will use a darning needle to anchor your final stitches with your loose end. After taking your hat off the needles, you can use your yarn tails to close gaps and smooth edges before you tie them off.

Learn to close hat tops in this knitting lesson from Liz Chandler @PurlsAnd Pixels.

Below you will find both video and written guides to help you learn how to finish knit hats.

Video Guide: How to Finish Knit Hats (Bind Off & Weave in Loose Ends)

Written Guides: How to Finish Knit Hats

Practice With My Knitting Patterns

Ready to try it?

Learn to make a simple knit beanie hat in all sizes with this knitting pattern by Liz Chandler @PurlsAndPixels.

You will finish Simple Knit Beanie hats with the yarn tails as I’ve shown you in this lesson.

Basic Slouch Hat knitting pattern by Liz Chandler @PurlsAndPixels.

My Slouch Hat pattern is finished by weaving in the loose ends in the same manner.

Learn to finish knit hats with loose ends in this knitting tutorial from Liz Chandler @PurlsAndPixels.

Up Next

Next, let’s learn to make knitting increases. The “Make One” increases add stitches to your rows. Learning these stitches will allow you to shape the thumbs of gloves and more.

Learn the make one knitting increases in this knitting lesson with Liz Chandler @PurlsAndPixels.

Go Back to the Learn to Knit Index