Are you ready to start your gardening journey but feeling unsure about where to begin? Don’t worry, I’ve got you covered! I remember how overwhelming it felt when I first started gardening. That’s why I’ve created this step-by-step checklist to help you avoid the common pitfalls and create the garden of your dreams. Use myfree Garden Planning Checklist as your step-by-step roadmap to a thriving garden. 🌼
Your Garden Foundation: First Steps
Before grabbing those tempting seed packets, establish your garden’s foundation. Success starts here:
Map Sun Exposure: Identify full sun, partial sun, and shade areas.
Locate Water Sources: Ensure easy access for watering.
Test Soil: Determine soil type and pH to plan amendments.
Measure Available Space: Work with what you have, big or small!
Seasonal Planning Guide
Follow the checklist’s timeline to help stay on track. Be sure to check your region’s growing season to be sure you don’t plant things outside before your last frost and that they will have time to finish growing before the first frost:
February–March (Garden Planning & Preparation)
Order seeds early for the best selection.
Gather essential tools.
Set up your indoor growing area.
Sketch your garden layout.
Plan your composting system.
March–April (Early Season)
Start indoor seedlings like tomatoes and peppers.
Prepare garden beds by clearing debris and adding compost.
Plan and install irrigation systems for your garden.
Add soil amendments to boost fertility.
May–June (Planting Season)
Harden off seedlings for outdoor planting.
Group plants by water needs to simplify care.
Set up trellises, stakes, or cages for support.
Create a planting schedule to stagger harvests.
July–October (Harvest Season)
Follow your harvest calendar to pick at peak ripeness.
Share extra produce with friends or local food banks.
Preserve your harvest by canning, freezing, or drying.
Keep detailed notes for next year’s planning.
Pro Tips for Gardening Success
Plan Ahead: Great gardens start with thoughtful preparation.
Test Soil Annually: Healthy soil leads to healthy plants.
Stay Consistent with Weeding: Prevention saves time and effort.
Rotate Crops: Protect your soil and avoid nutrient depletion.
🎁 Free Resource Alert!
Download the comprehensive Garden Planning Checklist, save, or print and let it guide you through every stage of gardening, whether you’re starting a small herb container or planning a full vegetable garden.
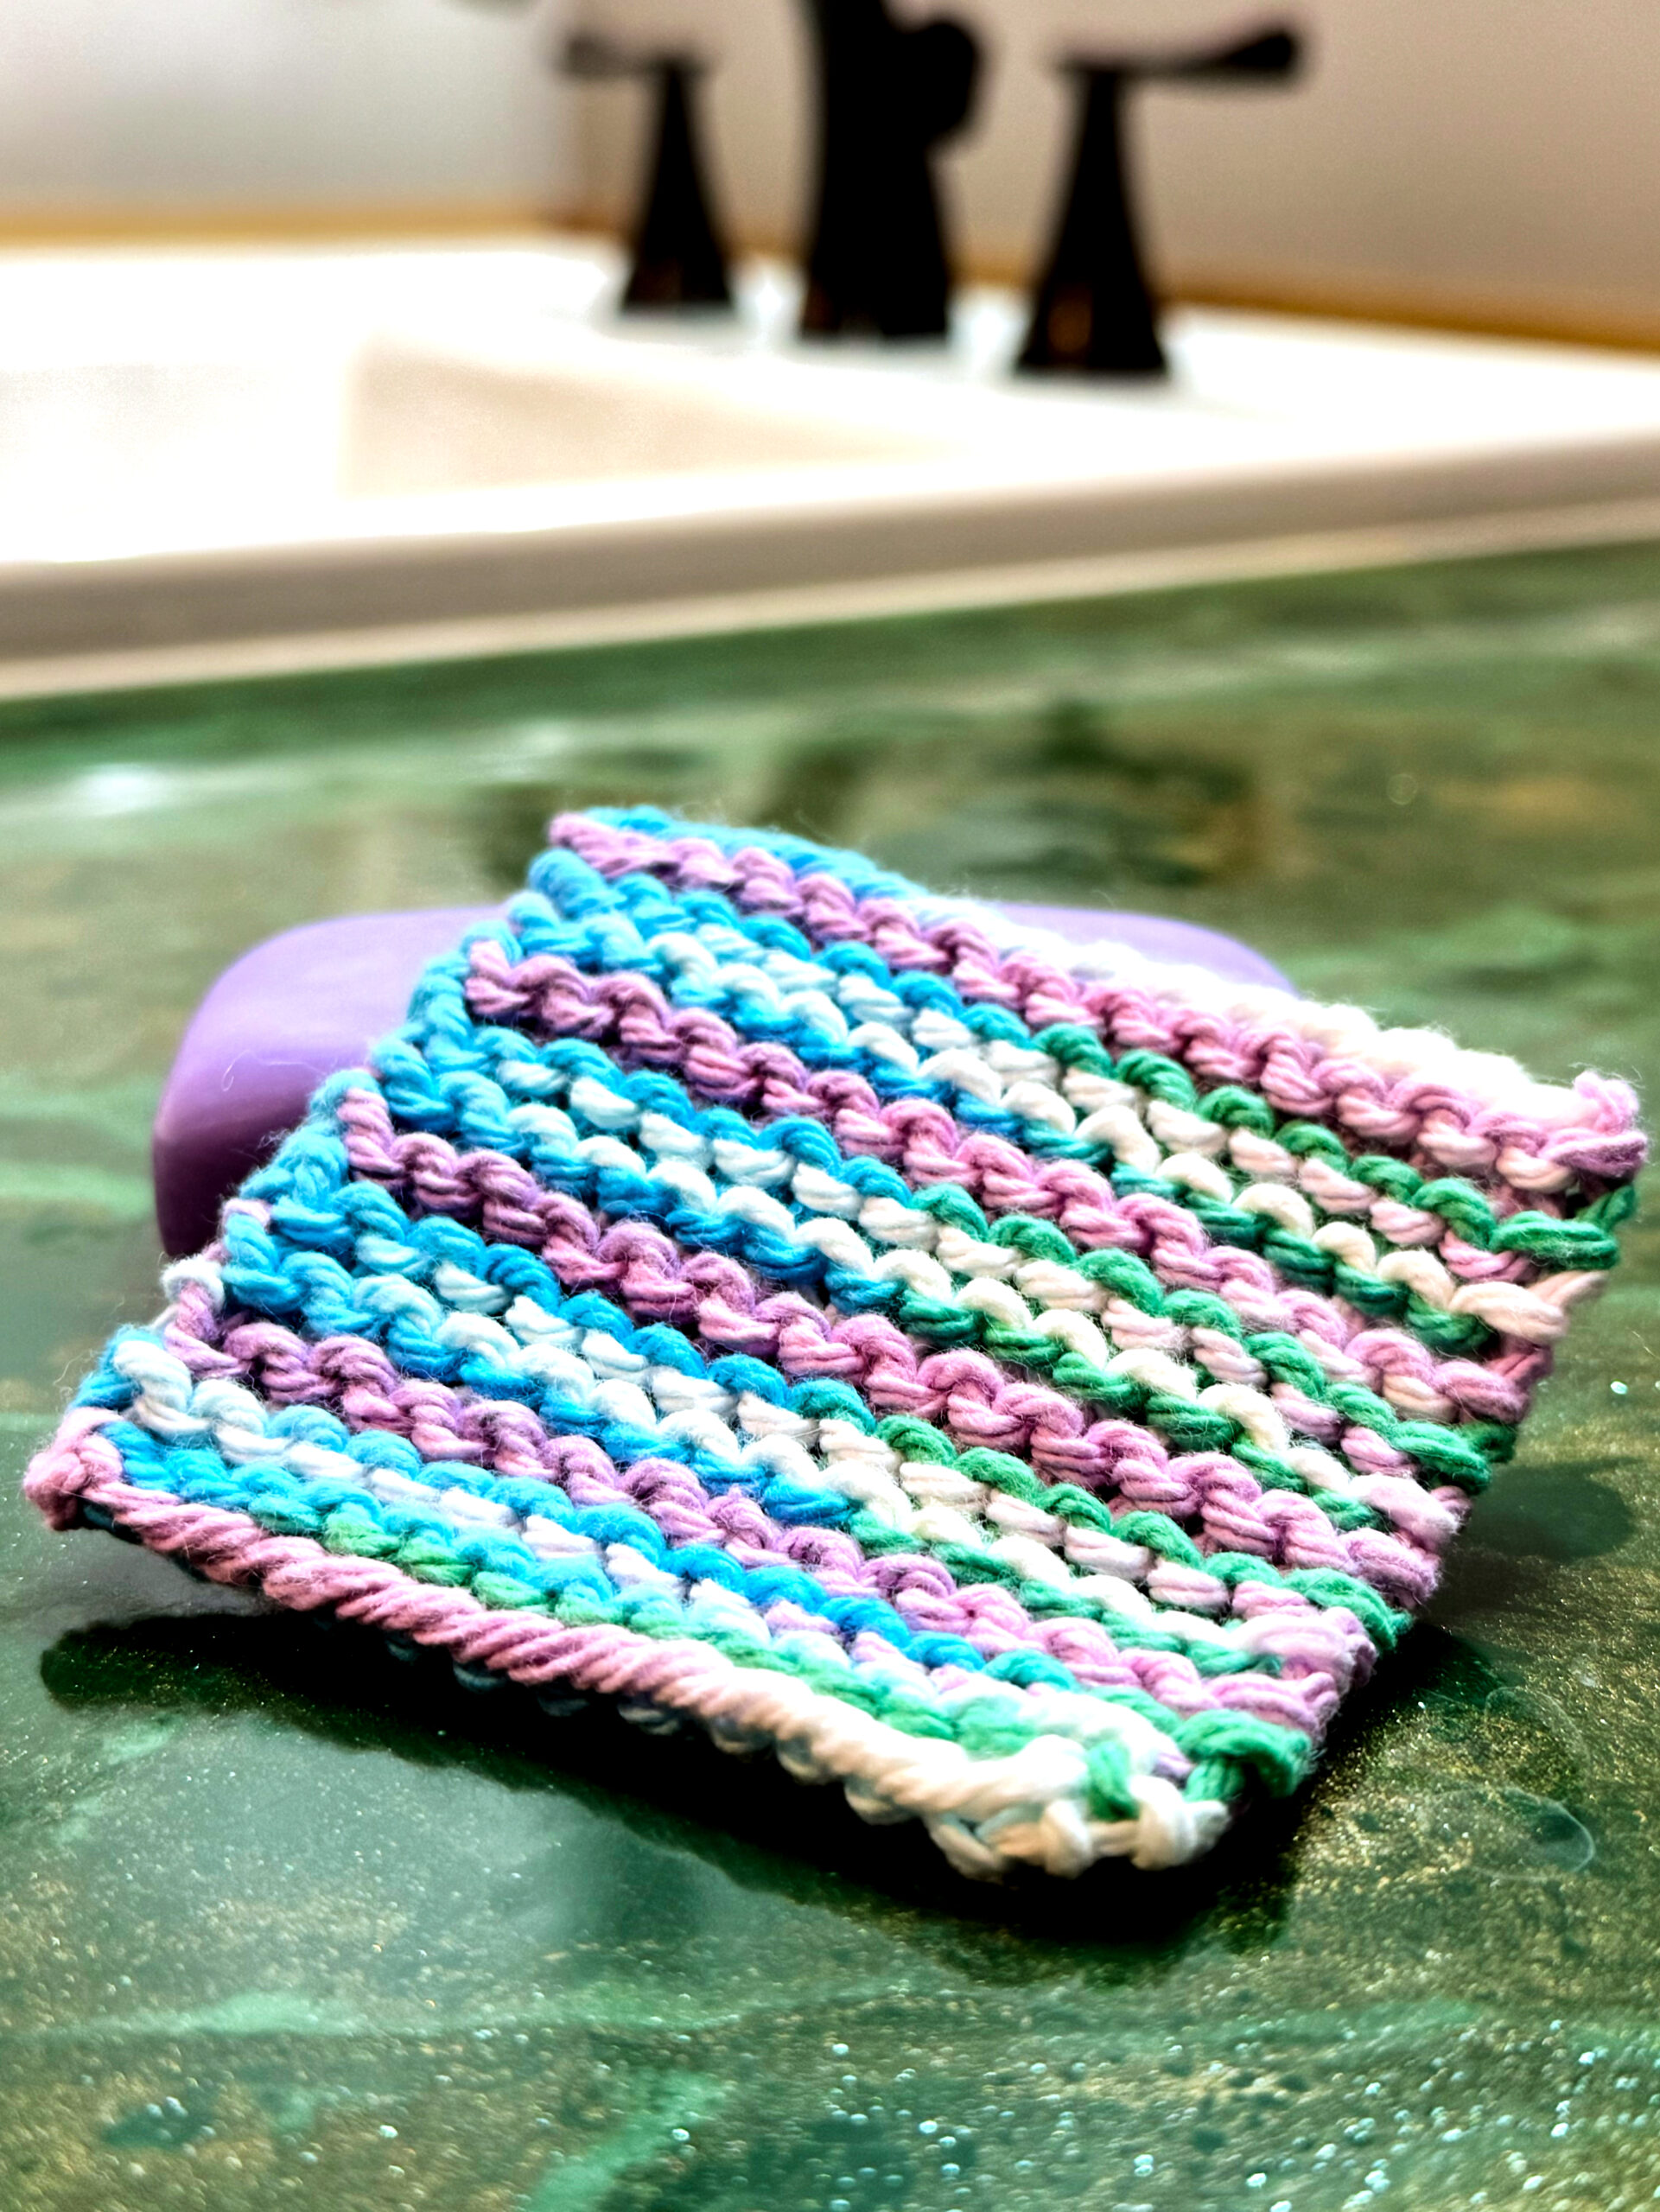
A Quick & Practical Knit for Your Sustainable Kitchen ✨
Free Knitting Pattern by Liz Chandler @PurlsAndPixels
Looking for an eco-friendly and beginner-friendly knitting project? This double-thick cotton washcloth pattern is perfect for creating durable, reusable kitchen essentials in no time. With simple stitches and two strands of cotton yarn, you can make a full-sized washcloth or a mini 3-inch scrubby for smaller cleaning tasks.
Whether you’re crafting for your home or gifting handmade items, this pattern is practical, sustainable, and oh-so-satisfying to knit.
Why Two Strands Are Better Than One
Using two strands of cotton yarn held together makes your washcloth thicker, sturdier, and perfect for heavy-duty tasks. Whether you’re wiping counters, scrubbing dishes, or tackling tough spots, this quick-knit washcloth is ready for action. And if you’re short on time, the mini 3-inch scrubby version offers the same durability in a smaller size that’s great for pots, pans, or even exfoliating!
Double-Thick Cotton Washcloth Pattern
This project is ideal for beginners and experienced knitters alike! For this easy project, you only need to know how to:
This pattern is for personal use, gifting, and charitable donation of completed items. You may also sell handmade items created using this pattern. Do not copy this pattern and distribute it. If you’d like to share the pattern, refer your friends to my website, purlsandpixels.com so they may obtain a copy.
If you find any errors or have any questions, email purlsandpixels@gmail.com and I will do my best to help.
I’d love to see your finished work! Tag your photos with @PurlsAndPixels on Twitter or Instagram.
Knitting a washcloth is a beginner-friendly knitting skill that teaches steady stitches on a small, useful project. In this knitting lesson you will learn how to cast on, knit rows in the garter stitch, and bind off so you can finish a face scrubby (or scale up to a larger washcloth) using the same steps.
Knit with Liz Chandler @PurlsAndPixels 🧶
It is time to put your knitting skills together and make something useful. In this lesson, we start with a face scrubby because it is small and fast. Once you understand the process, you can use the exact same steps to make a full-sized washcloth by casting on more stitches, or knitting more rows.
Cast on Row 1. This is how you add stitches to your needle to begin the washcloth. For the face scrubby, use the long-tail cast-on method to put 14 stitches on your needles.
How to Start Your Knitting – The Long-Tail Cast On for Beginners
Step 2: Turn Your Work
When you reach the end of your row, turn your work so the needle with stitches is back in your left hand and you are ready to knit the next row.
How to Turn Your Work in Knitting for Beginners – What to Do at the End of a Row
Step 3: Knit Every Row (Garter Stitch)
This washcloth uses the garter stitch, which means knitting every row. Cotton garter stitch creates a squishy, grippy texture that works well for washing.
Row 1: Knit across all 14 stitches.
Rows 2–27: Turn your work at the end of each row. Knit every row until your piece measures about 4 inches (10 cm) square.
To make a larger washcloth: Cast on more stitches for a wider cloth, or knit more rows for a longer cloth. The stitch pattern stays the same.
If your stitches look uneven, continue knitting. This repetition is how your hands learn the motion. If something looks wrong, read When Something Looks Wrong in Your Knitting.
How to Make the Knit Stitch
Step 4: Bind Off
When your washcloth is the size you want, bind off to secure your stitches.
How to Take Knitting Stitches Off the Needles – Bind Off Knit Stitches
Step 5: Finish Loose Ends
Use a darning needle to weave in loose ends. This secures the yarn tails and makes your washcloth ready to use.
How I Weave in and Tie Off Loose Ends on Flat Knitting
Troubleshooting Tips
Focus on stitch count and steady tension. Most “messy” beginner fabric improves quickly with practice.
Counting stitches: You should have 14 stitches on your needle at the end of every row.
Tension check: Cotton should feel firm but not tight. If it is hard to insert your needle, loosen up slightly. For help, read Knitting Tension.
Mistakes: If you want to fix a dropped stitch or a weird spot, use Fix Knitting Mistakes.
You just finished your first cotton washcloth. The small version is perfect for removing makeup, gentle cleansing, testing new stitches, quick gifts, and even cute drink coasters.
Learn the full beginner system: You can keep learning to knit for free at PurlsAndPixels, or follow the complete structured beginner path in Liz Chandler’s Knitting Guide: Learn to Knit with Practical Patterns.
Caring for hand knits can feel overwhelming, but after a decade of knitting (and plenty of mistakes), I’ve learned what actually works. As a solo parent and the creator behind PurlsAndPixels, I’ve found practical ways to keep handknits beautiful, even with a busy life and an active child. Let me share my best tips and a personal story that taught me one of my biggest lessons.
Essential Knit Care: What Actually Works (A Recovering Perfectionist’s Guide) 🧶
Let me share a secret: I’m surprisingly reckless with my knits. And you know what? They’re doing just fine! Here’s my real-world, honest-to-goodness care method:
Basic Washing Steps (The Truth Edition)
Confession time – I use my washing machine! 🤫 Here is what I do to care for a handknit item:
THE ONE ABSOLUTE RULE: Never. Ever. Ever. Put your knits in the dryer unless you’re planning to felt them or want a surprise doll sweater. Always lay flat to dry. This is the hill I’ll die on.
Fiber-Specific Care (The Reality Version):
Wool: Tougher than you think! Cold water, delicate or handwash cycle, no drama.
Cotton: Can handle a bit more, but why push it?
Acrylics: Fun fact – acrylic is literally plastic in fiber form. And you know what happens to plastic when it gets too hot? Yep, it melts. Hot water or dryer heat will turn your beautiful acrylic sweater into a sad, crackly mess. Stick to cold water and lay flat to dry.
Blends: When in doubt, treat it like your precious wool.
Remember: Your handknits aren’t as delicate as the internet might have you believe. They can handle real life – just keep them away from that dryer and warm/hot water!
The Velcro Incident: A Knitting Care Lesson Learned
My first ‘perfect’ knit was a baby blanket for my son. I felt like every stitch was flawless, the tension perfect. It was my masterpiece. Then came the Velcro incident.
A harmless-looking toy snagged the blanket, pulling stitches and leaving snags everywhere. My heart sank. That first project, meant to be a keepsake, now carried imperfections.
But here’s the thing about knitting (and life) – perfection isn’t always the point. Those snags became part of our story, marking moments of real life with an active little one. Still, I learned some valuable lessons about protecting precious knits!
Sneaky Snag Culprits to Watch Out For:
Velcro: The knitwear destroyer! Check those baby toys, shoes, and jackets.
Zippers: They look innocent but can catch your stitches in a flash.
Jewelry: Those dainty rings and bracelets? Stitch snatchers in disguise.
Pet Claws: Our furry friends don’t mean to, but those little paws can pull.
Rough Surfaces: Beware of splintery wood and rough upholstery.
Pro Tip: When gifting baby knits, I now include a gentle note about Velcro awareness. It’s saved many a blanket from meeting the same fate!
Remember: While we can’t prevent every snag in life (or knitting), we can be mindful of these sneaky culprits. Your handknits deserve that much! 🌿
Cozy Knits Storage Solutions That Work 🧶
Living in a small space has taught me the art of storing precious handknits. Here’s what really works (and what I actually use!):
Fold with Love: Stack your sweaters like I do here – see how the teal sweater keeps its shape? Proper folding prevents shoulder distortion and maintains your knits’ natural structure.
Clear Storage Champions: Using transparent containers (like this one!) lets you easily spot your favorites while keeping them dust-free. Plus, you can see exactly what you have at a glance!
Layer with Care: Notice how these colorwork pieces are carefully stacked? This prevents any snagging between delicate patterns. That pink and orange fair isle beauty stays perfect!
Seasonal Organization: Sort by season and store similar items together – makes switching out your wardrobe so much easier
Remember: Your handknits are treasures that deserve thoughtful storage. With these simple solutions, they’ll stay beautiful for years of cozy wearing! ✨
Emergency Hand-Knit Care
Accidents happen, especially with kids or pets! Here’s how to handle them:
Snags:
Don’t pull or cut the snagged string.
Use a crochet hook to gently pull the yarn back through.
Work from the wrong side if possible.
Gently stretch the piece to try to bring the yarn back into it’s original shape.
Stains:
Blot (don’t rub).
Rinse with cool water immediately.
Test cleaning solutions on a hidden spot before applying.
Holes:
Catch them early.
Use matching yarn to repair.
Seek professional help for large or intricate repairs.
Build an Essential Hand-Knit Care Kit
Keep these tools in mason jars for quick fixes (Amazon Affiliate Links):
Pro tip: Save yarn scraps from each project for future repairs by winding them into tiny balls (lesson here) or around old gift cards and storing them with these supplies!
Wash knits before storing to remove oils and dirt.
Add cedar or lavender sachets for moth prevention.
Store in a cool, dry place.
Fall/Winter:
Check for moth damage before use.
Refresh cedar blocks or sachets.
Air out stored items before wearing.
Real-Life Knitting Care Routines
Life gets messy. Here’s how I balance precious handknits with reality:
Spot clean whenever possible to extend time between washes.
Air out knits after wear to freshen naturally.
Keep a basic care kit on hand for quick fixes.
Address issues promptly to avoid permanent damage.
Embrace imperfections—they tell the story of a loved, well-used knit.
Remember: Perfect Is Overrated
That baby blanket with Velcro snags? My son still treasures it. Every imperfection tells a story of love, learning, and real life. While caring for knits is important, the “oops” moments often become cherished memories.
Pro Care Tips From My Knitting Journey
Always check pockets before washing.
Keep spare buttons in a labeled jar.
When in doubt, air it out.
Share Your Stories
What’s your first “perfect” project? Any care disasters you’ve learned from? How do you balance real life with precious handknits? I’d love to hear your stories! Drop a comment or send me a message on social media. Find me @PurlsAndPixels on all platforms. 🧶
Feeling the winter blues creeping in? Same here! This time of year can feel so gray and dreary. But as someone who spends a lot of time at home, I’ve discovered ways to make any space feel warm, inviting, and full of life. From houseplants and rustic touches to creative storage ideas, these budget-friendly tips will help you embrace the cozy cabin vibes we’re all craving in 2025. Let’s beat the winter blues together!
How do you beat the winter blues? I want to know your ideas, too! #warmthoughts
Natural Light, Houseplants, & Cozy Corners: A Winter Must
2025 is all about maximizing natural light and adding greenery to brighten your home. Here’s how to bring those cheerful cabin vibes into your space:
Maximize natural light: Position your favorite chair near a window to soak up daylight during the short winter days.
Incorporate free decor like pinecones, seasonal branches, or dried flowers in vases or jars.
Mix textures: rustic wood furniture, chunky knits, soft wools, quirky quilts, and leafy greenery create a visually rich space.
Brighten Your Room with Happy Colors: Learn to Knit!
Feeling inspired to add more life and color to your space? Why not try knitting? It’s beginner-friendly, creative, and the perfect way to liven up your room with custom-made decor in your favorite hues.
Start with a simple project like a useful face scrubby, a cozy scarf, or a colorful throw. Not only will you create something unique, but you will also gain a relaxing hobby that adds warmth and personality to your home.
🧶 Check out my Beginner’s Knitting Guide for step-by-step instructions and a free pattern to get started today!
Transform your cozy space while practicing gratitude with my free Gratitude Blanket pattern! This beginner-friendly project is more than just a beautiful addition to your home, it’s a mindful making journey for 2025.
Perfect for beginners, this pattern features:
Simple garter stitch (knit stitches only)
Three size options (Baby, Throw, or Queen)
Flexible color changes to match your decor
Mindful gratitude prompts
Whether you’re cozying up by the window or adding warmth to your reading nook, this blanket becomes both a beautiful decor piece and a tangible record of your grateful moments. Brightening your home with a Gratitude Blanket may be a perfect way to beat the winter blues.
Budget-Friendly Ways to Beat the Winter Blues
Transforming your space doesn’t have to break the bank! Try these simple, affordable ideas:
Group mason jars in odd numbers for visually appealing decor.
Collect natural elements like pinecones or winter greenery for cost-free accents.
Use thrifted baskets or crates for stylish storage.
Rearrange your furniture to create a fresh perspective without spending a dime.
Light & Greenery: The Perfect Duo
Winter days can feel long and dark, but the right combination of lighting and greenery can make a world of difference:
Wrap twinkle lights around potted plants or display them in clear jars.
Add a rustic lantern for soft, ambient lighting.
Combine a bright window spot with a trailing houseplant to bring life to any room.
Practical Tips for Cozy Cabin Decor
The key to a welcoming home is blending comfort with practicality:
Keep blankets, books, and cozy essentials within reach in baskets or on shelves.
Use stylish trays or jars to organize small items like keys, coasters, or craft supplies.
Dedicate a space for your favorite hobbies, whether it’s knitting, journaling, or just sipping tea by the fire.
Quick Winter Blues Busters
Need a pick-me-up? Try these small changes to lift your spirits:
Rearrange your favorite corner for better light and flow.
Add pops of color with vibrant pillows, throws, or artwork.
Bring the outdoors in with a few fresh branches or potted plants.
Play with texture by layering knits, wools, and woven baskets.
Authenticity Is Trending
Forget perfection! The coziest spaces are the ones that feel lived-in and loved. Embrace your personal style with:
Decor that reflects your favorite activities and hobbies.
Houseplants that thrive in your environment.
Creative, functional storage that makes everyday life easier.
Personal touches that make your home feel uniquely yours (like our golden bull ukulele holder paired with a covered wagon drawing).
Stay Cozy, Friends!
This winter, let’s embrace the cozy cabin aesthetic to lift our spirits. Whether you’re enjoying a book by the fire, crafting in your favorite corner, or simply unwinding with a cup of tea, creating a space that’s warm, inviting, and full of personality can help you beat those winter blues.
Pro Tip: Start small! Even adding a potted plant and a string of lights can completely change the feel of a space. My cozy firsts? My llama in glasses painting print (I mean, who can’t help but laugh at that quirky face) and my ceramic paint drip lamp.🌿🪵
What Do You Think?
How do you make your home feel cozy during the winter months? I’d love to hear your tips!
Transform a frozen salmon fillet into a delicious, nourishing meal in just 35 minutes with this simple recipe. As someone who juggles running PurlsAndPixels, solo parenting, and managing a homestead, I understand the need for practical recipes that still feel special. This simple baked salmon recipe with herb butter has become my go-to for quick, wholesome dinners without the fuss.
🍋 Add fresh lemon to your portion before eating for extra zest.
Cozy Serving Suggestions 🌿
Pair this baked salmon with:
Roasted vegetables like asparagus, broccoli, or Brussels sprouts.
A fresh garden salad for a light and wholesome side.
Steamed spinach or rice to soak up the buttery sauce.
For an extra treat, try a slice of crusty bread to scoop up the melted herb butter. It’s the ultimate comfort food for cozy evenings!
Variations to Try 🌟
Lemon-Pepper Butter: Swap the herb butter for a lemon-pepper version.
Sweet & Savory: Add a drizzle of honey during the last 5 minutes of baking.
Garden-Fresh: Sprinkle with your favorite fresh herbs like dill, parsley, or chives before serving.
Storage Tips for Leftovers 📦
Keep leftovers in an airtight container in the fridge for up to 2 days. They reheat beautifully for a quick lunch the next day!
Why Frozen Salmon?
Frozen salmon is budget-friendly, accessible year-round, and retains its nutritional value. This recipe lets you skip the hassle of thawing, so dinner is ready faster. Plus, the herb butter adds just the right amount of flavor.
Simple 2-Ingredient Baked Salmon Recipe with Herb Butter
Serving Size:
1 Fillet = 1 Serving
Time:
35 – 40 minutes
Difficulty:
Easy
Ingredients
Frozen Salmon Fillet
Herb Butter
Directions
Preheat your oven to 350°F.
Line a baking sheet or glass baking dish with parchment paper.
Place the frozen salmon fillet on the parchment paper.
Top with herb butter (let it slowly melt into the fish as it bakes).
Bake for 30-35 minutes, or until the internal temperature reaches 145°F. Serve and enjoy!
Do you have a favorite way to prepare salmon? Share your tips and variations in the comments or tag me on Instagram @PurlsAndPixels. I’d love to feature your ideas!
A new year brings a world of possibilities for knitters. Whether you’re dreaming of cozy sweaters, intricate colorwork, or mastering new techniques, a clear project plan can turn those creative dreams into reality. Organize your space and then plan your next knitting projects with the free Knitting Project Checklist and Knitting Planner at the end of this article. Let’s get intentional about making this your most inspired knitting year yet!
Essential Steps for Knitting Success
1. Stash Assessment
Before diving into new projects, take stock of your yarn:
Inventory your yarn by weight, yardage, and fiber content.
Find your favorites: Note which yarns spark joy or inspire ideas.
Fill in the gaps: Identify missing weights or colors.
De-stash thoughtfully: Plan projects to use yarn that’s been sitting idle.
2. Skill Development Goals
Set intentions for leveling up your knitting this year:
List techniques you want to learn, like brioche, entrelac, or colorwork.
Seek patterns that teach those skills in manageable steps.
Plan for progression—start simple, then tackle complex designs.
Schedule dedicated time for tutorials or classes.
3. Project Timeline
Map out projects by season to stay on track:
Winter (Jan-Mar): Cozy accessories, temperature tracking projects, or indoor comfort items.
Spring (Apr-Jun): Lightweight garments, garden-inspired makes, or Mother’s Day gifts.
Summer (Jul-Sep): Portable projects, beach/travel knitting, or early holiday prep.
Fall (Oct-Dec): Gift knitting, warm layers, or festive decorations.
4. Supply Organization
An organized toolkit makes for smoother knitting:
Take inventory of needles, notions, and tools.
Review storage solutions to ensure everything is easy to find.
Maintain your tools—sharpen scissors, replace worn needles, and clean your knitting bag.
Match patterns to your stash for immediate starts.
6. Comfort Zone Expansion
Stretch your creativity by trying something new:
Experiment with unfamiliar yarn weights or fibers.
Play with bold colorwork or gradients.
Try challenging techniques like double knitting or cables.
Join a knit-along (KAL) focused on skill-building.
Tips for Knitting Joy and Productivity
Start Small: Kick off the year with quick wins like hats, mittens, or dishcloths to build momentum.
Track Your Progress: Use photos or a notebook to document your projects, celebrate successes, and learn from mistakes.
Stay Flexible: Allow space in your schedule for spontaneous inspiration or unexpected challenges.
Build Community: Share your goals with fellow knitters for encouragement and accountability.
Download Your Free Knitting Planner PDF
Plan your year of knitting with these two printable PDFs. Print the knitting project checklists as many times as you need to keep track of all of your patterns this year.
This knitting project checklist isn’t about rigid rules—it’s a flexible guide to help you find joy and creativity in your knitting journey. Ready to get started? Download your free project planner and let’s make this your most organized and inspired year yet! ✨
Knit Your Moments of Thankfulness into a Cozy Blanket 🌟
A Free Knitting Pattern by Liz Chandler @PurlsAndPixels.
Friends, let’s be honest: 2024 brought its share of challenges. Between solo parenting, running PurlsAndPixels, and navigating life’s daily surprises, I sometimes forgot to pause and appreciate the small moments. That’s why I’m starting 2025 with intention, and I’d love for you to join me in a mindful knitting project. At the break of the new year, I’ll be starting a Gratitude Blanket as a way to track all the joy this year will bring.🧶
Here is an idea of what your Gratitude Blanket might look like.
Tiny Bumps in the Plan are OK!
Living far from a major city leaves me without yarn on demand. I’ve ordered the fluffy wool blend online, but it’s delayed until January 10th. This means I can’t get started as planned, but that’s just fine! I’m still going to share the pattern with you, so you can start at your leisure. But remember, this blanket is meant to be a reflection of a year’s worth of happiness – don’t let setbacks (like delayed yarn) steal your joy. Have fun and take your time!
The Magic of a Gratitude Blanket
For this blanket, you will work in very simple garter stitch (knit stitches only). Instead of worrying over stitch count, the Gratitude Blanket pattern is meant to let your mind wander away from the project and reflect on the joy each stitch represents.
This isn’t just another knitting project, it’s a chance to weave mindfulness into every day. Each stripe tells a story. Choose colors that make you feel happy and inspired. For me, its:
Peaceful blue rows for quiet cabin moments with my son and our pets.
Sunny yellow stripes for unexpected joys (like perfect knitting weather!).
Growth-inspired green sections for personal victories, big and small.
Daily Practice Guide
Find a Quiet Moment: Mine is usually early morning with coffee.
Reflect: Think about one thing you’re grateful for.
Choose a Color Based on the Feeling:
Blue: Peace and calm (like snowy mountain views).
Yellow: Joy and happiness (like my son’s laughter).
Green: Growth and achievement (like mastering a new pattern).
Knit Your Row: Hold that thought as you knit—it’s like stitching the memory into the blanket.
Gratitude Prompts
Need inspiration? Here are some moments I’m thankful for:
Morning coffee watching the sunrise over the mountains.
A kind comment from our knitting community.
Finally working out that tricky cable pattern.
Cozy cabin moments by the fire.
The peace of knitting while snow falls.
Small victories in parenting or business.
Making this Gratitude Blanket Free Knitting Pattern
With such a simple stitch pattern, even beginners can knit this blanket. Get free knitting lessons that walk you through every step along the way at my Learn to Knit Index. You will need to know:
Three to six 129-yard (8 ounce) skeins of super bulky weight (No. 6) yarn* in your three favorite colors (shown in “Air Force,” “Mustard,” and “Succulent” Hometown Super Bulky Yarn by Lion Brand).
Baby size uses about 9 skeins of super bulky yarn
Throw size uses about 15 skeins of super bulky yarn
Queen size uses about 18 skeins of super bulky yarn
*Weights estimated with Hometown Super Bulky Yarn by Lion Brand; other yarn weights may vary.
12 stitches x 15 rows = 4 x 4 inches in Stockinette Stitch on No. 13 (9.0 mm) needles.
Abbreviations
k = knit
Instructions: Baby Size Gratitude Blanket
(40 inches x 40 inches or desired length)
Instructions: Use the long tail cast on. Knit flat, turning after each row. Make color changes as your joyful memories change. You can start a new row or just start knitting mid-row with a new, happy color for each knitting session.
Row 1: Cast on 146 stitches. (146 stitches) Turn.
Rows 2 – 159: k 146. (146 stitches). Turn. [Work should measure 39.75 inches at this point]
Row 160: Bind off loosely.
Cut yarn, leaving an 8-inch (20.32-cm) tail, and pull through. Weave in ends. Block if desired.
Instructions: Throw Size Gratitude Blanket
(50 inches x 60 inches or desired length)
Instructions: Use the long tail cast on. Knit flat, turning after each row. Make color changes as your joyful memories change. You can start a new row or just start knitting mid-row with a new, happy color for each knitting session.
Row 1: Cast on 182 stitches. (182 stitches) Turn.
Rows 2 – 239: k 182. (182 stitches). Turn. [Work should measure 59.75 inches at this point]
Row 240: Bind off loosely.
Cut yarn, leaving an 8-inch (20.32-cm) tail, and pull through. Weave in ends. Block if desired.
Instructions: Queen Size Gratitude Blanket
(90 inches x 90 inches or desired length)
Instructions: Use the long tail cast on. Knit flat, turning after each row. Make color changes as your joyful memories change. You can start a new row or just start knitting mid-row with a new, happy color for each knitting session.
Row 1: Cast on 328 stitches. (328 stitches) Turn.
Rows 2 – 359: k 328. (328 stitches). Turn. [Work should measure 89.75 inches at this point]
Row 360: Bind off loosely.
Cut yarn, leaving an 8-inch (20.32-cm) tail, and pull through. Weave in ends. Block if desired.
Keep it Visible: Mine will live by my favorite knitting chair.
No Pressure: Catch up during quiet weekends if needed.
Track Your Progress: Take photos to share your journey (great for Instagram!).
Date Your Gratitude Entries in a Journal: Each date becomes part of your story.
Make it easy on yourself: Use the magic knot to join new colors and save time weaving loose ends.
Why This Project Works
Mindful: Each row helps us pause and reflect.
Achievable: Simple enough for even the busiest days.
Meaningful: Creates a physical reminder of our journey.
Cozy: The end result? A warm hug of memories.
Start Your Journey
I’m casting on for the new year, and I’d love for you to join me! I’ll be sharing my progress with the Gratitude Blanket pattern here and on Instagram @PurlsAndPixels, along with the moments that inspired each color choice.
Ready to cast on your gratitude journey? Whether you start on New Year’s Day or jump in mid-year, each row adds to your story of thankfulness. Share your progress with #GratitudeKnitAlong. I can’t wait to see your blankets grow alongside mine! And I’m excited to see what colors you choose! What will your first grateful row represent? 🌿
Let’s make 2025 a year of mindful making, one stitch at a time. 💞
This pattern is for personal use, gifting, and charitable donation of completed items. You may also sell handmade items created using this pattern. Do not copy this pattern and distribute it. If you’d like to share the pattern, refer your friends to my website, purlsandpixels.com so they may obtain a copy.
If you find any errors or have any questions, email purlsandpixels@gmail.com and I will do my best to help.
I’d love to see your finished work! Tag your photos with @PurlsAndPixels on Twitter or Instagram.