When you want to change the size of your stitches between sections of a project, you can switch needle sizes. In the Magic Loop knitting method, you will work stitches off one long circular needle and onto a different long circular needle. This allows you to adjust your knitting gauge mid-project. Moving to a larger needle size will make your stitches larger, while moving to a smaller needle size will make your stitches smaller.
To switch needle sizes in the magic loop, you will replace the needle tip in your right hand with a new circular needle in another size. Then you will knit down one side of your magic loop, turn your work, and continue knitting until you have freed the old needles from your work. Then, you can continue knitting with the new sized needles.
Below you will find both video and written guides to help you learn how to switch needle sizes when you are knitting in the Magic Loop.
Video Guide: How to Switch Needle Sizes in the Magic Loop
Written Guide: How to Switch Needle Sizes in the Magic Loop
Switch Needle in Magic Loop, Step 1:
Work up to the point where the pattern instructs you to switch needle sizes. Pick up a needle in the new size with your right hand, ensuring the needle tips point toward each other.
Switch Needle in Magic Loop, Step 2:
Begin working the live stitches off the old needle size and onto the new needle size.
Switch Needle in Magic Loop, Step 3:
When you have finished working the live stitches off the first side of your magic loop, the left-hand needle tip will be free of the project.
Switch Needle in Magic Loop, Step 4:
Turn your work by rotating the entire project and pointing the needle tips toward the right. Pull the needle cord on the front side of your work leftward, to bring the front needle back into the live stitches.
Switch Needle in Magic Loop, Step 5:
Pull the back needle toward your right, moving it out of the set of stiches it was holding.
Switch Needle in Magic Loop, Step 6:
Bring the back needle around toward the front of your work, clasping it in your right hand and pointing the needle tips toward one another.
Switch Needle in Magic Loop, Step 7:
Following your pattern, work the live stitches off the right needle tip and onto the left.
Switch Needle in Magic Loop, Step 8:
When you have finished working the second half of the row/round, your old needles will be free of the work. Set the old needles aside and continue knitting on the new size needles.
You’ll knit the larger sizes in the round on circular needles and you will switch sizes mid-project.
Up Next
If you’ve been following along with my lessons, you are now ready to start shaping your knitwear. Decreases make your rows shorter, which is helpful in rounding the tops of hats and mittens. Learn how to make two simple decreases in the next lesson. (Coming 7/24/2021)
The “Magic Loop” is a knitting method that allows you to knit small tubes in the round on long circular needles. This style is a great substitute when you don’t feel like using double point needles (DPNs).
To knit in the magic loop, you will need to choose a long circular needle. Your knitting pattern will usually suggest a needle. If one is not suggested, however, a needle with a length between 29 inches (74 cm) and 36 inches (91 cm) usually works well for this technique. When I knit in the magic loop, I usually prefer to use 36-inch long circular needles (Amazon.com Affiliate Link).
When to Knit in the Magic Loop
Any time you want to knit a tube of fabric, you can use long circular needles to do so. The Magic Loop method is a great way to make smaller tubes that will not fit around your circular needles. This makes the Magic Loop a great substitute for working on double point needles. For example, working in this method can be especially useful for making small round knits like baby-sized mittens, hats, and sweater sleeves. You may even find the magic loop helpful in rounding the tops of larger hats.
Keeping Track of Rounds/Rows in the Magic Loop
When your rows connect seamlessly, they will turn into rounds. To keep track of your patterns, you will need a way to note where the rounds begin and end.
When you are working in the magic loop, you can use a stitch marker to identify where the rows end and begin. After joining the round, clip a stitch marker to the strand connecting your first and last cast on stitches. As you work each new row/round, you will need to unclip the marker and move it up to the next loop.
Watching the yarn tail can also show you where your rounds end and begin. When you cast on your knitting, you will have a tail leftover that hangs just below the final cast on stitch. Connecting the last cast on stitch to the first cast on stitch starts the next row/round, so the tail will always be located on the side of your work where the rows begin and end. If you notice this, you can work on in the magic loop without using a stitch marker.
Below you will find both video and written guides to help you learn how to knit in the round with the Magic Loop method.
Video Guide: How to Knit in the Round on in the Magic Loop
Written Guide: How to Knit in the Round on in the Magic Loop
Magic Loop, Step 1:
Using one end of the circular needle held in your right hand, cast on all of the stitches called for by your pattern; here, we will use the long-tail cast on.
Magic Loop, Step 2:
Locate the halfway point in your cast on. For example, there are 32 total cast on stitches pictured here. The halfway point will be between the two sets of 16 stitches.
Magic Loop, Step 3:
Gently bend the cord of the circular needle at the midpoint, bringing the set of stitches on the cord behind the right-hand needle. Take care not to twist the stitches around the needle; your cast on should keep a smooth edge.
Magic Loop, Step 4:
With your right hand, pinch the section of cord located just between the two sets of stitches.
Magic Loop, Step 5:
Carefully, begin pulling the cord toward the right.
Magic Loop, Step 6:
As you pull on the cord, slide the two sets of stitches onto the two ends of the circular needle.
Magic Loop, Step 7:
Take care not to twist the cast on stitches as you move them toward the needle tips. The stitches on the needle closest to you should have a smooth edge. The stitches on the needle furthest from you should have a bumpy or purl-like edge.
Magic Loop, Step 8:
Once all the stitches have been slipped onto the needles, turn your work; do this by flipping both needle tips over, so they point toward your right.
Magic Loop, Step 9:
Grasp the front needle and the live stitches with your left hand. Pull the back needle toward your right, moving it out of the set of stiches it was holding. The stitches will now be held in place by the needle cord. Take extra care not to twist the stitches during this step.
Magic Loop, Step 10:
Bring the back needle around toward the front of your work, clasping it in your right hand and pointing the needle tips toward one another. Once again, ensure that you have not twisted your cast on stitches before moving to the next step.
Magic Loop, Step 11:
Pick up the working yarn, which will be coming from the last live stitch on your cord, and wrap it on your hand in your desired knitting hold. Insert the right-hand needle tip into the first stitch on your left-hand needle tip (this is the slipknot / the first stitch you cast on).
Magic Loop, Step 12:
Work the stitch as your pattern instructs. Here, the pattern calls for a knit stitch. This will join the round, connecting the two ends of the cast on. If you wish to use a stitch marker to keep track of your rounds, clip it to the strand that connects the cast-on ends at this point.
Magic Loop,Step 13:
Following your pattern, continue working stitches off the left-hand needle tip and onto the right. When you have worked all the stitches off the left needle, you have finished half of one row/round.
Magic Loop, Step 14:
Turn your work by rotating the entire project and pointing the needle tips toward the right.
Magic Loop, Step 15:
Pull the needle cord on the frontside of your work leftward to bring the front needle back into the live stitches.
Magic Loop, Step 16:
Pull the back needle toward your right, moving it out of the set of stiches it was holding.
Magic Loop, Step 17:
Bring the back needle around toward the front of your work, clasping it in your right hand and pointing the needle tips toward one another. Following your pattern, begin working the second half of your row off the left-hand needle and onto the right.
Magic Loop, Step 18:
When you have worked all the stitches off the left needle, you have finished the row/round.
Magic Loop, Step 19:
Turn your work by rotating the entire project and pointing the needle tips toward the right. Pull the needle cord on the frontside of your work leftward to bring the front needle back into the live stitches.
Magic Loop, Step 20:
After your cast on row, and knitting one full round, your piece will be connected by a single strand of yarn.
Magic Loop, Step 21:
Repeat steps 11 through 19 for each additional row/round in your pattern.
Magic Loop, Step 22:
After working several rows/rounds, your tube-shaped piece will be connected seamlessly.
The more circular rows or “rounds” that you knit in this spiral method, the more tube-like your knit will become.
Practice With My Knitting Pattern
My Beginner Knit Ear Warmer Pattern is a great place to start learning to knit in the round. The smaller sizes are especially fun to knit in the Magic Loop.
To finish a knitted tube, such as an ear warmer or headband, you can bind off in the round on circular needles. A “standard bind off” on circular needles allows you to end your knitted work with a smooth edge. You can use any type of needle to take live stitches off circular needles (circulars, straight, or a DPN) – all you will need is one needle tip in the correct size.
Before you start, remember to loosen up:
This bind off tends to be a bit tight, so you may want to loosen up your tension when knitting this last row. Many patterns will specifically tell you to “bind off loosely,” to remind you to adjust the tightness of the stitches.
Or, go up two or three needle sizes:
Instead of adjusting how tightly you knit, you can also switch needle sizes. Try moving to a needle that is two or three sizes larger than the one you have been using for the rest of the pattern. This allows you to keep the same knitting tension in your yarn as you cast off, while still loosening the bind off stitches enough to match the rest of the piece. Some patterns instruct you to switch needle sizes for the last row, to help you ensure your ends are more even.
Below you will find both video and written guides to help you learn how to bind off on circular needles.
Video Guide: How to Bind Off in the Round on Circular Needles
Written Guide: How to Bind Off in the Round on Circular Needles
Bind Off on Circular Needles, Step 1:
Following the pattern you have been using for previous rows, knit the first two stitches of your last row.
Bind Off on Circular Needles, Step 2:
Insert the left needle tip into the front loop of the first knit stitch on your right needle from front to back.
Bind Off on Circular Needles, Step 3:
Lift the first stitch on the right needle up and over the second stitch on the right needle.
Bind Off on Circular Needles, Step 4:
Pull the second stitch on the right needle through the first stitch on the right needle.
Bind Off on Circular Needles, Step 5:
Slide the left needle out of the stitch on the right needle.
Bind Off on Circular Needles, Step 6:
At this point, the first knit stitch should be anchored onto the second and only one loop should remain on your right-hand needle.
Bind Off on Circular Needles, Step 7:
Following your pattern, work the next stitch off your left needle and onto the right needle.
Bind Off on Circular Needles, Step 8:
In the same manner as before, lift the first stitch on your right-hand needle over the second stitch, drawing the second stitch through the first, leaving only one stitch on your right-hand needle.
Bind Off on Circular Needles, Step 9:
Repeat steps seven and eight until you have reached the last two stitches and freed the left-hand needle from your work.
Bind Off on Circular Needles, Step 10:
Lift the first stitch on the right needle over the second, leaving only one stitch on your right-hand needle.
Bind Off on Circular Needles, Step 11:
Set your work down, leaving the knitting needle in the last stitch. With very sharp scissors, clip the working yarn about eight or ten inches away from your last stitch. This will free your work from the ball of yarn.
Bind Off on Circular Needles, Step 12:
Pull the yarn tail through to anchor it in; do this by enlarging the last stitch with your knitting needle until the tail slides completely through. The loop will become a straight loose end.
You’ll knit the larger sizes in the round on circular needles, so you can practice this standard bind off.
Up Next
The “Magic Loop” is a knitting method that allows you to knit small tubes in the round on long circular needles. This style is a great substitute when you don’t feel like using double point needles (DPNs). Find out how to knit in the magic loop with the next lesson.
As you knit in the round on circular needles, you may be asked to switch needle sizes. This is often included in knitting patterns that change the stitch size between sections of a project.
To switch needle sizes while knitting in the round, you will pick up a circular needle in a new size with your right hand. Using the new needle, knit the live stitches off the old pair of circular needles and onto the new size. When you’ve finished switching to the new circular needle, don’t forget to put your stitch marker back in place at the end of the row/round.
Below you will find both video and written guides to help you learn how to switch needle sizes on circular needles.
Video Guide: How to Switch Circular Needle Sizes When Knitting in the Round
Written Guide: How to Switch Circular Needle Sizes When Knitting in the Round
Switch Circular Needles, Step 1:
Work up to the point where the pattern instructs you to switch needle sizes, then let go of the needle in your right hand. If you have a stitch marker at the end of your row/round, set it aside.
Switch Circular Needles, Step 2:
Pick up a needle in the new size with your right hand, ensuring the needle tips point toward each other.
Switch Circular Needles, Step 3:
Begin working the live stitches off the old needle size and onto the new needle size.
Switch Circular Needles, Step 4:
When you have finished working the row/round, your left needle (in the old size) will be free of the project.
Switch Circular Needles, Step 5:
Set the old needles aside.
Switch Circular Needles, Step 6:
Slide the stitches on the left toward the tip of the left circular needle. Place your stitch marker back on the needles to mark the beginning/end of your rounds. Prepare to knit the next row. You have now completely switched knitting needle sizes.
Just as with DPNs, you can also knit a seamless tube on circular needles. Like a double point needle, a circular needle has sharpened tips on both ends. A circular needle, however, will have a long, flexible cord between the two needle tips. This allows you to bring the ends of the needle together and knit in spirals or “rounds.” With fewer needles to manage, knitting in the round on circular needles tends to go a bit faster.
When to Knit with Circular Needles
When you want to seamlessly knit a tube of fabric, circular needles are a great option. Choose a circular needle that is roughly the same length as your finished object will measure around in circumference. Here, I am making the brim of an adult-sized hat with 16-inch circular needles. Shorter circular needles allow you to make smaller items like gloves or socks, while longer circulars are great for pillow covers and sweaters.
Below you will find both video and written guides to help you learn how to knit in the round on circular needles.
Video Guide: How to Knit in the Round on Circular Needles
Written Guide: How to Knit in the Round on Circular Needles
Knit with Circulars, Step 1:
Using one end of the circular needle held in your right hand, cast on all of the stitches called for by your pattern; here, we will use the long-tail cast on.
Knit with Circulars, Step 2:
To keep track of the beginnings and ends of your rounds, slip a stitch marker onto your needle tip directly after your last cast-on stitch.
Knit with Circulars, Step 3:
Ensure you have not twisted any stitches. If you have not twisted stitches, you will have a straight edge along the bottom of your knitting needles.
The back side of the needles will have a “purl-side” pattern. If your stitches are twisted, straighten them before proceeding.
Knit with Circulars, Step 4:
Continue grasping the same needle with your right hand while packing up the other end of the circular needle in your left hand. The needle tip with the last cast-on stitch should be in your right hand and the tip with the first cast-on stitch (the slip knot) should be in your left hand.
Knit with Circulars, Step 5:
Wrap the working yarn (coming from the righthand needle) around your left hand in your preferred yarn hold. Bring the needle tips toward one another to assume the knitting position.
Knit with Circulars, Step 6:
Slide the live stitches rightward, toward the tip of the left needle. Insert the right-hand needle tip into the first live stitch on the left-hand needle (this was your slipknot).
Knit with Circulars, Step 7:
Work directly into the live stitch and move it off the left needle tip and onto the right; this will “join the round” and connect the two ends of your cast on.
Knit with Circulars, Step 8:
Following your pattern, continue working stitches off the left needle tip and onto the right. When you have reached your stitch marker, you have finished one row/round.
Knit with Circulars, Step 9:
Move the stitch marker from the left-hand needle to the right-hand needle.
Knit with Circulars, Step 10:
Begin working your next row/round.
Knit with Circulars, Step 11:
The more circular rows or “rounds” that you knit in this spiral method, the more tube-like your knit will become.
Practice With My Knitting Pattern
My Beginner Knit Ear Warmer Pattern is a great place to start learning to knit in the round. The larger sizes can be made with 16-inch long circular needles.
To bind off in the round on DPNs (double point needles), you can use the same “Standard Bind Off” that you learned when knitting flat pieces. Just as before, you will chain the stitches in your last row (round) together. On double point needles, you will bind the live stitches off one needle at a time, until there is only one stitch left to anchor in. This will create a smooth, flat edge at the end of your knit round.
Before you start, remember to loosen up:
Keep in mind that this bind off tends to be a bit tight, so you may want to loosen up your tension when knitting this last row. Many patterns will specifically tell you to “bind off loosely,” to remind you to adjust the tightness of the stitches.
Or, go up two or three needle sizes:
Instead of adjusting how tightly you knit, you can also switch needle sizes. Try moving to a needle that is two or three sizes larger than the one you have been using for the rest of the pattern. This allows you to keep the same knitting tension in your yarn as you cast off, while still loosening the bind off stitches enough to match the rest of the piece. Some patterns instruct you to switch needle sizes for the last row, to help you ensure your ends are more even.
Below you will find both video and written guides to help you learn how to bind off on double point needles (DPNs).
Video Guide: How to Bind Off on Double Point Needles
Written Guide: How to Bind Off on Double Point Needles
Bind Off on DPNs, Step 1:
Following the pattern you have been using for previous rows, make the first two stitches of your last row. In this example, knit one, then purl one.
Bind Off on DPNs, Step 2:
Insert the left needle tip into the front loop of the first stitch on your right needle from front to back.
Bind Off on DPNs, Step 3:
Lift the first stitch on the right needle up and over the second stitch on the right needle.
Bind Off on DPNs, Step 4:
Pull the second stitch on the right needle through the first stitch on the right needle.
Bind Off on DPNs, Step 5:
Slide the left needle out of the stitch on the right needle.
Bind Off on DPNs, Step 6:
At this point, the first stitch should be anchored onto the second, and only one loop should remain on your right-hand needle.
Bind Off on DPNs, Step 7:
Following your pattern, work the next stitch off your left needle and onto the right needle.
Bind Off on DPNs, Step 8:
In the same manner as before, lift the first stitch on your right-hand needle over the second stitch, drawing the second stitch through the first, leaving only one stitch on your right-hand needle.
Bind Off on DPNs, Step 9:
Repeat steps seven and eight until you have reached the last two stitches and freed the first left-hand needle from your work.
Bind Off on DPNs, Step 10:
Lift the first stitch on the right needle over the second, leaving only one stitch on your right-hand needle. Set aside the second empty DPN from your left hand. Rotate the work in your left hand so that you can continue working off the next left-hand needle.
Bind Off on DPNs, Step 11:
Repeat steps seven and eight until you have freed the second left-hand needle from your work. Set aside the third empty DPN from your left hand. Rotate the work in your left hand so that you can continue working off the next left-hand needle.
Bind Off on DPNs, Step 12:
Repeat steps seven and eight until you have freed the third left-hand needle from your work. Set aside the third empty DPN from your left hand.
Bind Off on DPNs, Step 13:
Set your work down, leaving the knitting needle in the last stitch. With very sharp scissors, clip the working yarn about eight or ten inches away from your last stitch. This will free your work from the ball of yarn.
Bind Off on DPNs, Step 14:
Pull the yarn tail through to anchor it in; do this by enlarging the last stitch with your knitting needle until the tail slides completely through. The loop will become a straight loose end.
Practice With My Knitting Patterns
If you’ve been following my lessons, you now have enough information to knit your own Beginner Ear Warmers. Get the pattern here.
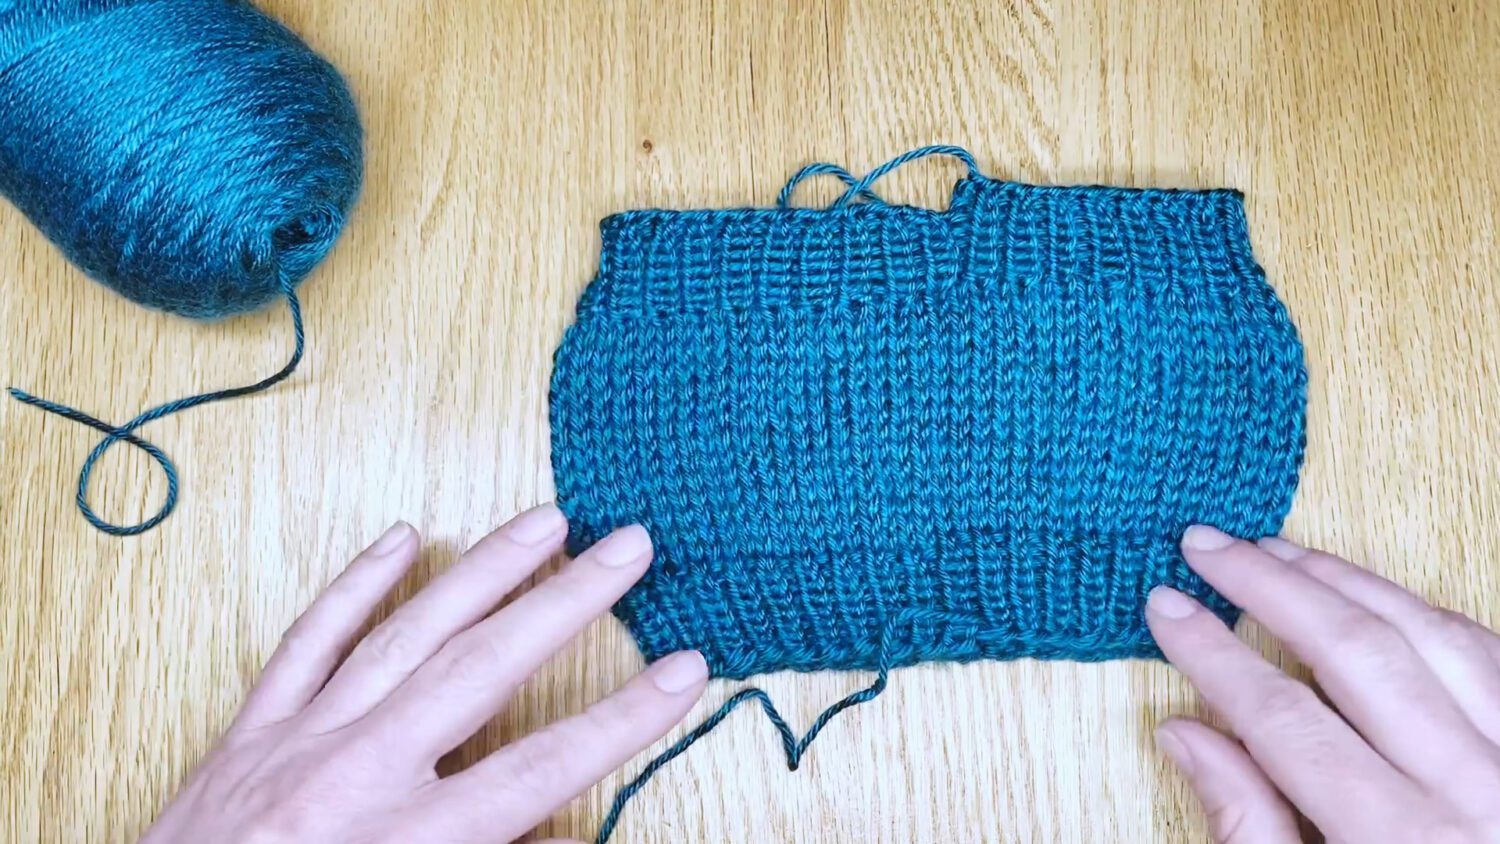
Sometimes you will need to switch needle sizes while working with double point needles (DPNs). This is usually done to adjust the tension in your knitting. Switching your needle sizes between sections of knitting can help you ensure different patterns match in gauge. When working with double point needles, you will change the needle in your right hand and use it to work the live stitches off the original sized needles.
Below you will find both video and written guides to help you learn how to switch needle sizes on double point needles.
Video Guide: How to Switch Needle Sizes on DPNs
Written Guide: How to Switch Needle Sizes on DPNs
Switch DPNSizes, Step 1:
Work up to the point where the pattern instructs you to switch needle sizes, then set the needle in your right hand aside.
Switch DPNSizes, Step 2:
Pick up a needle in the new size with your right hand.
Switch DPNSizes, Step 3:
Begin working the live stitches off the old needle size and onto the new needle size.
Switch DPNSizes, Step 4:
When you have finished working the live stitches off the first DPN (your first left-hand needle in the old size), it will be free of the project.
Switch DPNSizes, Step 5:
Set the old DPN aside. Pick up a DPN in the new size with your right hand and work the live stitches off the second old-sized DPN.
Switch DPNSizes, Step 6:
Continue moving live stitches off the old sized DPNs in your left hand and onto the new sized DPN in your right hand. When all the live stitches have been moved onto the larger DPNs, set the last old sized needle aside. Replace it with a new sized needle in your right hand. You have now completely switched knitting needle sizes.
Practice With My Knitting Patterns
Ready to try it?
My Cup Cozy pattern is a great place to practice. You will switch double point knitting needle sizes twice in this pattern. Find it here.
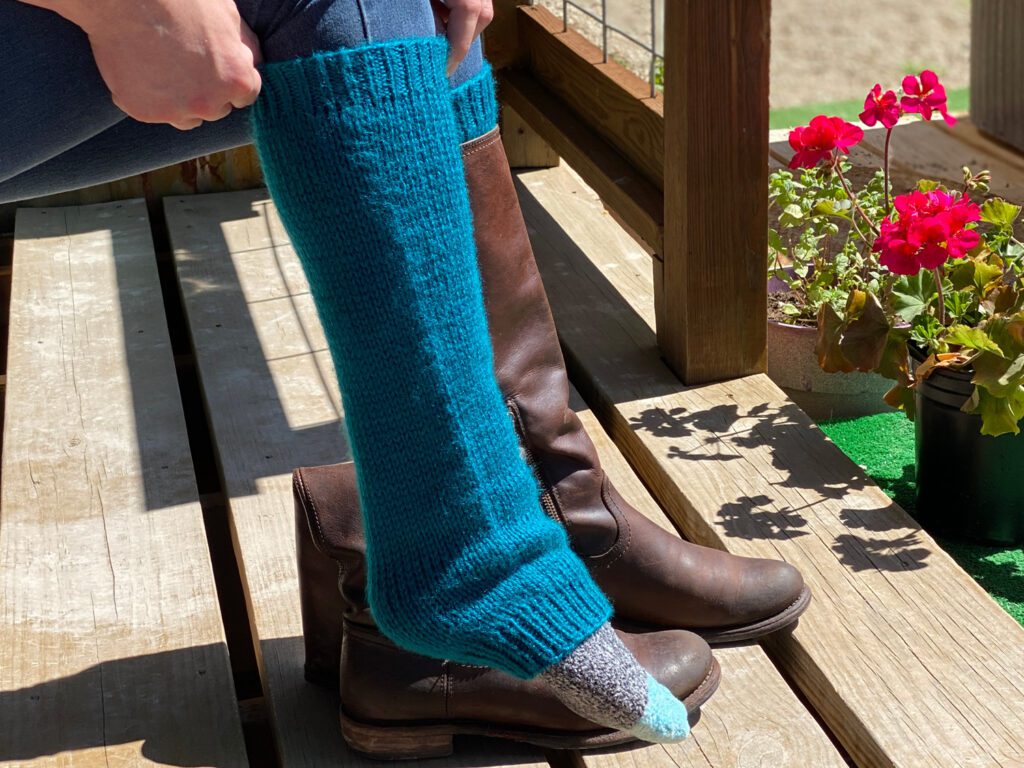
Or, try making Leg Warmers. You will use one size needle for the ribbing and another for the smooth section of the leg warmer. Find the pattern here.
You can create a tube of knit fabric with double point needles (DPNs). This is done by casting your stitches onto three or four needles, then joining the ends of the cast on. Working around these needles in continual spirals creates a circular tube; this is referred to as “knitting in the round.”
When to Knit with Double Point Needles
Double point needles are well suited to knitting smaller tubes of fabric. For example, they can be especially useful for making small round knits like baby-sized mittens, hats, and sweater sleeves. Your DPNs will also be helpful in rounding the tops of larger hats.
Keeping Track of Rounds/Rows on Double Point Needles
When your rows connect seamlessly, they will turn into rounds. To keep track of your patterns, you will need a way to note where the rounds begin and end.
You can use a stitch marker to identify where the rows end and begin. On double point needles, you can clip the marker to the loop located between your first needle and third needle. As you work each new row/round, you will need to unclip the marker and move it up to the next loop.
Alternatively, watching the yarn tail on double point needles can show you where your rounds end and begin. When you cast on your knitting, you will always have a tail leftover that hangs just below the final cast on stitch. Connecting the last cast on stitch to the first cast on stitch starts the next row/round, so the tail will always be located on the corner where your rows begin and end. If you notice this, you can work on DPNs without using a stitch marker.
Below you will find both video and written guides to help you learn how to knit in the round on double point needles (DPNs).
Video Guide: How to Knit in the Round on Double Point Needles (DPNs)
Written Guide: How to Knit in the Round on Double Point Needles (DPNs)
Knit in the Round with DPNs, Step 1:
Using one double point needle (DPN), held in your right hand, cast on 1/3 of the stitches called for in your pattern; here, we will use the long-tail cast on.
Knit in the Round with DPNs, Step 2:
Once the first set of stitches are cast, grasp the first needle between your right pointer and middle fingers.
Knit in the Round with DPNs, Step 3:
Pick up a second DPN and hold it between your right thumb and pointer finger. Bring your left hand back into cast-on position.
Knit in the Round with DPNs, Step 4:
Cast on the next stitch with the second DPN.
Knit in the Round with DPNs, Step 5:
To avoid gaps in your knitting, take care to bring the first and second DPNs close together as you cast on the first stitch on a new needle.
Knit in the Round with DPNs, Step 6:
Cast on the remaining stitches for the second needle (approximately 1/3 of the total cast on stitches).
Knit in the Round with DPNs, Step 7:
Ensure you have not twisted any stitches. If you have not twisted stitches, you will have a straight edge along the bottom of your knitting needles.
The back side of the needles will have a “purl-side” pattern. If your stitches are twisted, straighten them before proceeding.
Knit in the Round with DPNs, Step 8:
Next, place the first and second DPN between your right pointer and middle fingers. Pick up a third needle and place it between your thumb and pointer finger. Bring your left hand back into cast-on position.
Knit in the Round with DPNs, Step 9:
Cast the remaining stitches onto the third needle, ensuring you do not leave a gap between the second and third needle.
Knit in the Round with DPNs, Step 10:
Before moving on, ensure your stitches have not twisted, as you did in Step 7.
Knit in the Round with DPNs, Step 11:
Now, you will begin forming a triangle with the three needles in your hands. Turn the first needle (the top needle) counterclockwise, taking care not to twist your stitches.
Knit in the Round with DPNs, Step 12:
When you can see the purl-side of the first needle, you can begin turning the second needle in the same manner.
Knit in the Round with DPNs,Step 13:
Form a triangle by ensuring the last cast on stitch and the first cast on stitch (the slipknot) meet.
Knit in the Round with DPNs, Step 14:
Pick up the working yarn with your left hand, in your preferred yarn hold. Clasp the first double point needle (the needle which holds your slip knot) with your left hand; you will knit the stitches off this needle first. Grasp the fourth double point needle in your right hand and prepare to knit.
Knit in the Round with DPNs, Step 15:
Slide the live stitches rightward, toward the tip of the left needle. Insert the right-hand needle tip into the first live stitch on the left-hand needle (this was your slipknot). Work directly into the live stitch and move it off the left needle and onto the right.
Knit in the Round with DPNs, Step 16:
Following your pattern, work until you have moved all the live stitches from the left needle onto the right needle. At this point, pivot the knitting counterclockwise and place the next set of live stitches in your left hand. Move the empty needle to your right hand, then continue knitting into the live stitches.
Knit in the Round with DPNs, Step 17:
When you have worked all the stitches off three needles, you have finished one circular row or “round.” Repeat steps 14 through 17 for each pattern row.
The more circular rows or “rounds” that you knit in this spiral method, the more tube-like your knit will become.
Practice With My Knitting Pattern
My Beginner Knit Ear Warmer Pattern is a great place to start learning to knit in the round. The smaller sizes are especially suited to double point needles (DPNs).